Carball Pinball 8
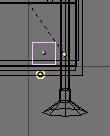
At the moment we can allready play, but we're not good, and we "loose" the ball quickly. So we need to relaunch another one! To do this, we'll place an object that will detect when the ball is "out" and add a new one. Place a Cube at the lower right side ( see images above), it will be hidden by the plane above (otherwise we'll make it invisible).
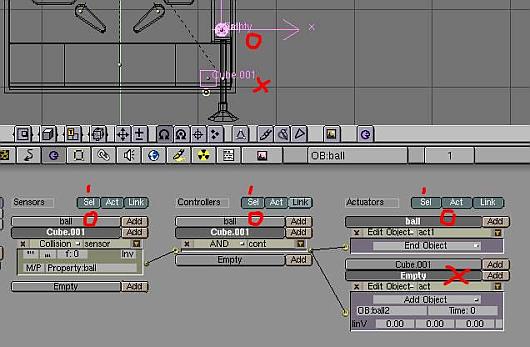
We must give a Collision Sensor to the cube in order that he can "feel" the ball. In the Property field, write "ball", the property name that we've assigned to ball object, later. To add a new ball, select it, place the cursor at his center and make a copy, name it "ball 2", and move it to a hidden layer (not active). With the cursor still in the middle of sphere, add a Empty. Add a Edit Object Actuator to the Empty, with Add Object, and OB:ball 2. Now select the Cube and the Empty, enable the 3 blue Sel buttons and link the Cube Controller to the Empty Actuator. Now, when the new ball appears we must remove the old one. So, we'll add a End Object Actuator to the ball (use the image above as a guide).
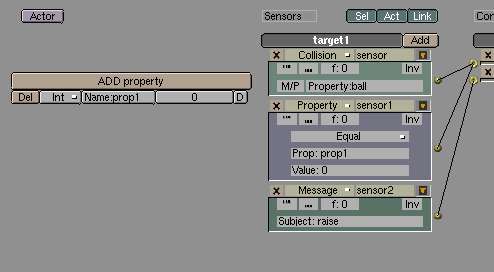

Ok, now we'll give a counter to our Pinball game, this way, when we hit a target, we'll get score points. Copy the settings in the two images above to all the targets in the game, changing the "prop1" name for each target (prop1, prop2 and so on).
I'll explain the setup.
When the ball with the Property "ball" hits "Collision" the "Target1", the "Ipo" will play the animation and put the target down, and pass the "Message" to "Subject:point", and Assign to the "Property:prop1" the value 1. Check that the Collision needs a "Prop1" Value:0 to work. This way, if the ball re-hit the down target the "data" will not work. Now, that the game engine "knows" when a target was hited ( Collision Sensor) we can show it adding points in a counter. The game engine can exchange "data" between objects and scenes easily with the Message Sensor and Actuator. To show the counter, we'll place it in a diferent scene.
Add a new empty scene, and name it "counter".
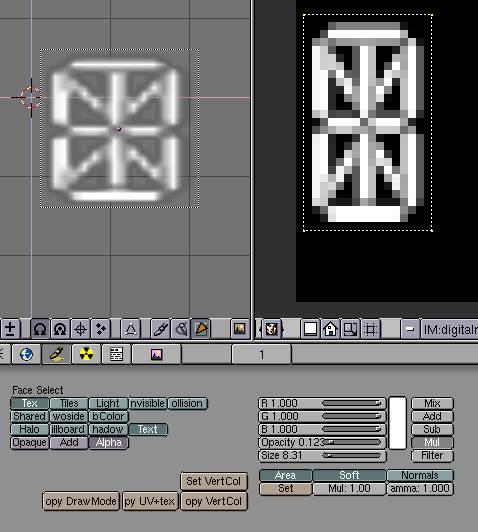
Add a Plane, it will be the counter. To show text in the game engine, BLENDER needs a special bitmap font texture. Load it from the directory that we've talk previously, it's the "digitalreadout.tga" file. With the plane selected, do F, Load the font texture in the UV window, and in the Face Select buttons enable Text and Alpha buttons.
Add a Camera to the scene and place it in a way that the counter is at middle rigth location.
Now to to make the plane a "counter" add a "Int" property and NAME IT "Text" with Value:0. Add a Message Sensor with "Subject:point" (this will get the "data" from the Message Actuator from the other scene) and link it to a Property Actuator with "Add", "Text" property and a value of 100 ( this way when the ball hits a target in the game scene, the message pass data to the counter scene and add 100 points to the plane/counter property). Now, we must make the counter/scene visible. Go to the game scene, add an Empty, add a Always Sensor linked to a Scene Actuator with "Add Overlayed Scene" and "SCE:counter".
An "Overlayed Scene" will allways stay in front of scene/objects, the contrary of Background Scene. With this setup when we start the game the counter will be visible immediatly.

As an exercise i'll let you finish the game, but i'll give you some hints ( use the CarPinball file as a guide).
To raise the targets give a Collision Sensor to the round target, linked to a "raise" Ipo targets Actuator -Give a Collision sensor to the bumper ( to get points) linked to a "Subject:point" Message Actuator.
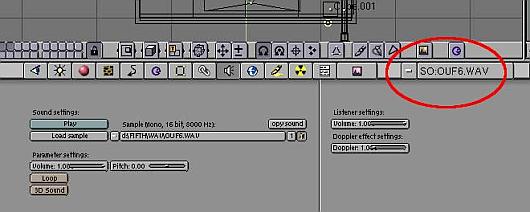
To add sound, go to the Sound Buttons, and load the wav ( only format supported) files you want, or those from the CarPinball game, that are somewhere in your disk near the textures directory. Then add Collision sensors ( or use those available) linked to a Sound Actuator with the wav file name.
To give the ball a nice real-time illumination, select the ball, opress F key, Select all faces, enable the Light button and click the Copy Draw Mode button. Then, move the sphere to layer 2. Now add two lamps with different Energy setting in this layer, one at the table left top, and the other at the down right side. Don't forget to make the layer "active".
To check if the propertys "work" click over the little D button at the right on the "ADD Property" Brick.
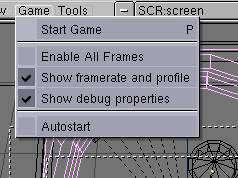
Then in the Game menu, enable "Show framerate and profile" and "Show debug properties".
Now, when you press P key to "play", the Property and other useful ( fps) informations are visible on the screen and you can check if values change.
Add a Camera in the game scene and place the pinball game at the view center.