Carball Pinball 4


Modelling the Ball trail. Place the cursor in the center of the scene ( axis).
In Top view, add a Sphere with the default values. Add a Circle with 18 points. Enter Edit mode and select all the points, Copy and Scale them like the image above. Select the half-down vertices and delete them. Look at the image above right. Use the red lines as a guide to extrude points and reshape them. When done, select all the vertices, and in Side view, extrude down.You must obtain a corridor to launch the ball in the game table.

Another object.
Center the cursor. Add a Circle with 12 vertices. Make two copys, and move them to the square grid corners, pressing Ctrl key to Snap the objects to the grid ( see image). Join the 3 circles, enter edit mode, delete the unnecessary vertices, and connect the extremities of the now open circles, in order to obtain the closed triangular shape as in the image above. Enter edit mode and Build faces. In Side view, extrude with the same height as the previous made objects.

Now, we'll model the bumper. In Top view, add a Cylinder with 12 vertices. In Side view, enter Edit mode and delete the down row of vertices. Select the center vertice and raise it a little. In Top view, add a 12 points Circle and in Side view, place it between the previous cylinder top vertice, and the round base row of vertices. Extrude down to make the body of the bumper.
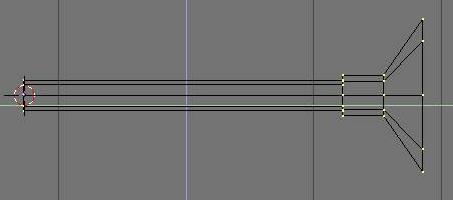
I don't know how to name this object ( launcher?). But, to make it, add a Circle in front view, with all vertices selected, build faces, and in Side view, Extrude to make the long body. Toggle between Front and Side views, Extrude and Scale to obtain the conic section.

Now, let's do the rectangular targets. Place the cursor at the midlle of axis. Add a Circle, with the default vertices, and Scale it in a way that the circle was near the rail shape (this circle will be just a guide). Place the cursor at the circle center. Add a Cube and scale like in the image below ( compare with the Ball size).

Be sure that the cube is placed in the guide circle center (after this, you can delete the circle). Enter Edit mode, and place the cube vertices near the rail. Now we'll duplicate the cube with a circular path. In Edit buttons, set the Degr: button to 45, the Steps: to 5 and press the Spin Dup: button. Now we have six cubes. If they touch eachother, raise the Degr: setting, (you must redo the operattion). Rotate the cubes at the right and make them independant (select each cube and do P key to separate it).

Another target. A round one, now. Add a Circle, with 12 vertices, in front view. In side view Extrude to the right. Select the low four vertices and extrude them way down to make a base.

In the image above you have a general view of the pinball table with the final location of the objects we have modelled. Add a Plane and place it in order that he hides the start section of the pinball table ( red line in the image).