Carball Pinball 5

Now, we'll start to work with one of the great functions of BLENDER: the UV Texture Editor.
As i've said before, "games" must have a much limited number of vertices/polygons. So is vital to the "beauty" and "interest" of a "game", that textures are well "used". The first object that we'll texturise, is the Pinball Table.
Open two adjacent windows in BLENDER, at left side a 3D window, and in the right side, an Image window ( click the Current Window Type icon and choose the one with the face - see image above).
Select the Table object in the 3D window, and in the UV Texture Editor window, click the Load button, and browse trough your hard drive to find a desired texture. Place the mouse cursor in the 3D window and press F key, to activate the Face Select mode. Do Alt-Z kwys ( potato mode) to bring the Open GL shading mode to the 3D window.

Press A key to select all faces, and your object will show a grid that fits the object edges lines. In the UV window, click the little white rectangle and search the texture ( name) you have loaded before in the menu. When done the texture image will appear in the window.

To be Open Gl and multi-platform compliant your textures must have a size
with a power of 64 ratio, ex: 64x64, 64x128, 64x256, 128x128, 128x256, 256x256, and so on.BLENDER suports JPG, PNG and TGA file formats. If you want
to follow the tutorial closely, and use the same textures, load the CarPinball
file and in the Tools menu choose Unpack to Current dir. After this, you'll have a
Texture Directory somewhere on your disk ( normally in the same directory of the saved downloaded file), with the game textures that you can load on the tutorial.

In 3D window press U key, this will open the UV Calculation menu. Choose the "From Window" item.
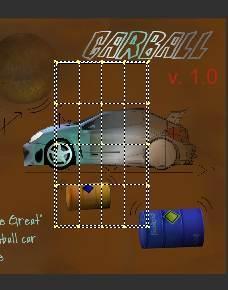

Now in the UV window ( image above left) you can see the same grid that's in the 3D window ( image above right, surely at a different scale). Scale and place the grid by your taste. You can monitor your actions in the UV window, by watching the 3D window (normally, the texture covers the selected object). If the padlock icon button (in UV window) is enabled, you can see the modifications in real time.
You start to feel the power of the UV Texture Editor.
Almost all the 3D window edit functions work here. You can Move, Scale, Rotate, and mirror the UV vertices.
The UV Calculation menu is fairly obvious. "Cube", "Cylinder" and "Sphere" will adapt the texture automatically to objects with those shapes. The others are variations with the texture size.
The most important and useful ( to me), is the "From Window" item . The basic method is: BLENDER takes a "snapshot" of the selected faces in 3D window at current view angle, and "copy" it to the UV window. So you can use orthogonal views to precise texturing, or the trackball or camera view to "on the fly texturing" .
To dissociate the top border of the table from the bottom ( or texturise interior parts of objects), in the 3D window, with the right mouse button, pressing the Shift key select the border faces.
Before continuing, select the top plane/glass, F key, to enter Face Select mode, select the face, and enable the blue Invisible button, this way when in game mode, we can see trough the glass.

It's important to know well the Vertex Paint buttons . Enable the Vertex Paint buttons in the icon bar . This will show the vertex paint interface (the one at half-right in the image above). Now, if you select an object and do F key, this will show the Face Select buttons either (at image left side). Togheter they form a powerful tool. With an object selected, if you do V key, you enter Vertex Paint mode, and you can "paint" the entire object ( Shift-Z in 3D window to activate the Open GL mode). To "paint" only some faces, you must do F either, and select the desired faces. You choose a colour with the standard RGB cursors. The Opacity defines the "quantity" of colour ( 1 will cover in one "shot"), and Size is the size of your brush (a cursor circle in 3D window).

In the image above you have the result of the different "paint" modes ( Grey buttons at far right in the Face Select buttons window).
Look closer at the image. The 5 rectangles are equal at the beginning. 1 - MIX : Basic Green and Red colour 2 - ADD : Basically this will light your colours 3 - SUB : Basically this will darker your colours fast 4 - MULT : This will darker your colours with shades 5 - FILTER : ?, judge yourself.


You can do nice things only with the "paint" tools. In the image above I show you a fast example. The vertex colours will blend with the textures, so they're perfect to simulate shadows, or add nice effects to your textures.
The important Face Select buttons to begginers are:
TEX : this is automatically set when you assign a texture.
LIGHT : If you want to enable the real-time light in the "game".
COLLISION : Enable by default, necessary to the game engine to calculate collisions between objects.
The other important buttons are:
SET VERT COL : This will assign the current colour to the selected faces.
COPY DRAW MODE :This will assign the Face Select settings to all the selected faces.

The bumper don't need textures. Select the object, do F key, select all the faces, choose a white colour in the paint buttons and press the Set Vert Col button, the object will became white (or other colour you've choosed).
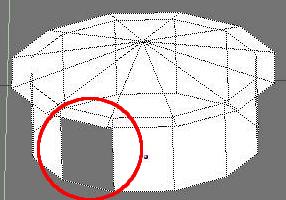
Maybe some faces are "bizarre" ( see image above), this is a "normals" problem. Select the "bizarre" faces, press Tab key, then W, and choose Flip Normals in the menu. TAB key again, and, normally, all should be correct now.
In Top view, deselect all faces, and select one face over two. When done choose a red colour and press the "Set Vert Col", to obtain the red and white bumper. Do the same with the body.