Stella Toon 6

Finally, here we are!! The Constraints task!
That's the reason why I've made this tutorial.
At a moment, I've decided to make a little character animation with armature, and when wanted to use the new constraints tools, I've found, that for a starting aproach, they're quite obscur!
I've searched for some tutorials on the subject, but outside the nice one by Lyubomir Kovachev, no others found.
How to apply a Constraint?
Well, it's quite easy, as most BLENDER actions and functions.
Select your Armature enter Pose mode, Ctrl-Tab keys , select one bone ( image above at right side) and in the Constraint buttons window press tha "ADD" button. Press the little white square button to "get" the "Bone Constraint" menu.
Here you have many choices, but the one that interest us, is the "IK Solver" item one.
Why?
When BLENDER creates an Armature (let's say, three bones in a row, in one time for ex., like in the image above, at left side), they're "automatically" in Forward Kinematics ( remember, the barbarisms), in other words, the "child" bones will follow the "parent" ones.
But sometimes is useful to have an Inverse Kinematics setup where the bones will form a link chain controled by one end bone.
So, we'll continue our setup in order to give our armature an IK mode.
With the "IK Solver" item choosed previously, enter the name of the Armature in the "OB:" field ( the armature becames "crazy", but all's under control) and in the new "BO:" field, enter the name that will control the bone's chain ( normally a "null" bone, an extra bone that you must add, more or less at the location you want, here, the "IK control" bone).
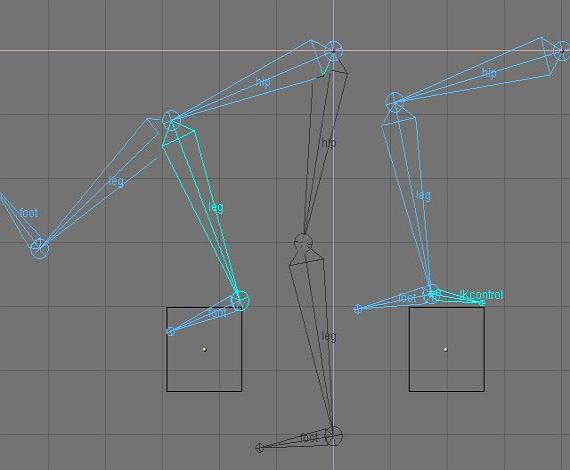
In the image above I show you an example where's the IK method is very useful.
With the "traditional" way ( at left, in the image above) a simple action like placing the foot over a box can became quite painfull.
You must Select the "hip" bone ( parent) first, and Rotate it to an unprecise location ( the trial and error method rules with FK), then Select and Rotate the "leg" bone and finally the "foot" one, but, most probably ( as in the image), there's not the good "pose", so you must refine it.
With the IK method, you only need to Select the "IK control" bone and move it to the desired location ( all the bones in the "chain" will follow).
Fast and easy ( unfortunatelly there's some cons, as we'll see later)!!
Let's start to apply Constraints to our character.
I must warn you, the previous method it's not "the solution" ( far from it) to easily animate a 3D model.
There's many parameters that will influence the constraint choices; armature and movement complexity, level of detail of the character's mesh, available time of course and to worst things, bones are "heavy" on "computing time".
To do this tutorial and the little animation at the beggining of it, I've spent many hours, searching the best "IK setup" for the desired result.
I advise you to do the same.
So, what's the "target" here? A little animation, with a basic low-poly character, and, no details or inserts, and no much time available.
Ok, here's my "solution"!!
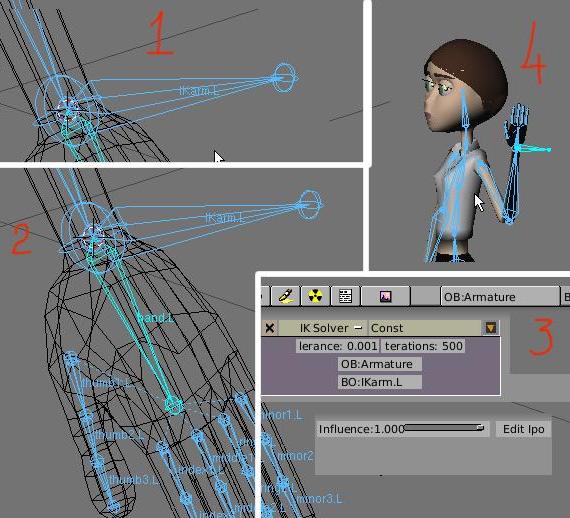
To have general control of the hand ( and the arm), add in Side view, a "null" bone ( more or less like in the image above at top left, 1).
Then, Select the "hand.L" bone ( 2) and add a "IK Solver" ( 3) with the name of the Armature and the name of the "null" bone, with "Influence: 0.500".
Now, select the "null" bone and move it! Great, you can control all the arm!
But, how about the fingers? Can you imagine, even a simple action like pointing a finger can became a headache with the FK method ( specially with our " full skeleton hand ").
Be cool! I've found an almost easy way to control the hand and the fingers ( but not to precise).
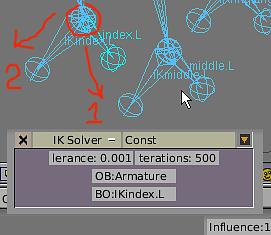
Place the cursor at the end bone tip of a finger and extrude a "null" bone, in a more or less, inverted V shape, like the image above, 1)
To create the second "null" bone add an "Armature" ( this way the new bone will not be linked with the others, and that's what we want, 2).
Select the first "null" bone and add an "IK solver" constraint with the name of the second "null" bone ( 1) and "Influence:0.500".
This is the same method as the previous arm one! The problem here, is that the finger's bones can move and bend freely, taking "bizarre" positions.
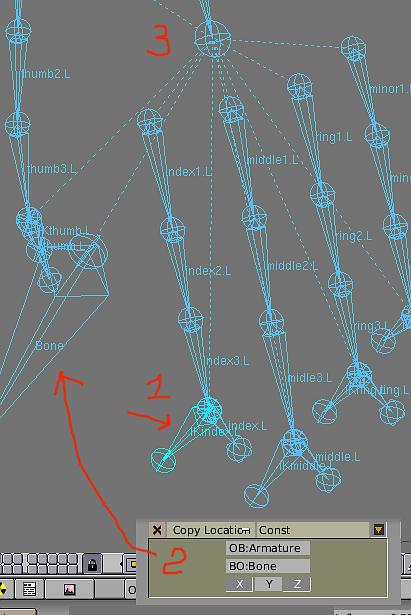
To solve this problem, we must add a third "null" bone ( aie, aie, sure we'll have display problems) and place it near the hand palm center.
Select the second "null" bone ( 1) and add a "Copy Location" constraint ( 2), with the name of the third "null" bone and the X and Z buttons enabled. Repeat these steps for all the fingers ( i know, it's a pain).
Don't forget to manually link all the second and third "null" bones to the "hand" bone, this way if you move your character they'll follow.
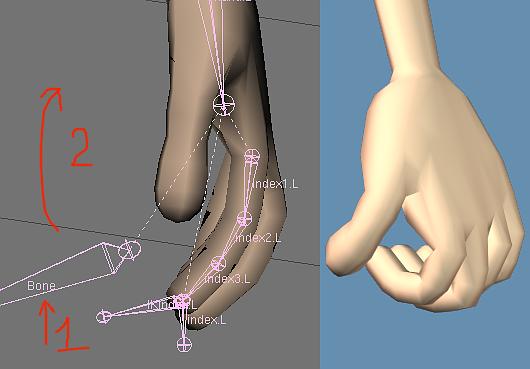
Normally, if all's right, when you select the third "null" bone in Pose mode and move it, the model will open or close all the fingers in a quite nice way.
To bend the entire hand, Select the "hand.L" bone and Rotate it in a classic manner.
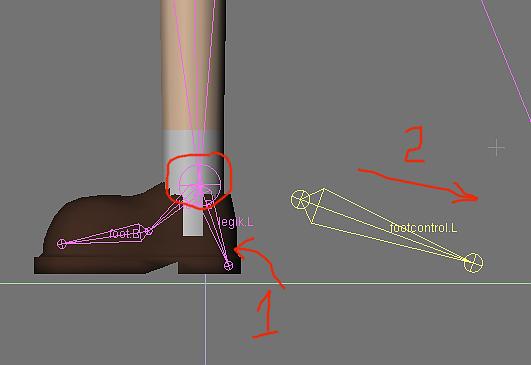
To control the leg and foot, we'll use a much more simple method ( hopefully).
Place the cursor at the last leg bone tip and Extrude the bone ( linked, 1).
Place the cursor a bit away, in Side view, and add an Armature bone ( not linked, 2).
Select the first "null" bone, add an "IK Solver" constraint with the name of the second "null" bone and "Influence:0.500".
That's all!
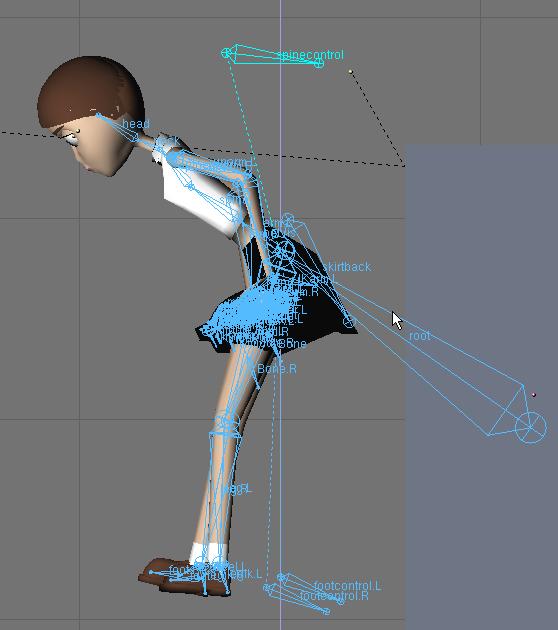
Finally, to control the body upper part general movement, in Side view add a "null" bone, and place it near the head's back.
Select the higher spine bone and add an "IK Solver" constraint with the name of the "null" bone and "Influence:0.500".
As for the others "null" bones, link it manually to, let's say, the "root" bone.
To control the entire character ( move, rotation) use the "root" bone.
As you can see, there can be almost as many Constraints "setups" as animators.
For important projects, you can make several copys of the character, and use different "setups" to fit your needs.