Game Level Design II 1
Still few, beautiful and FINISHED Blender Games!
That's why I'll try to show, how to do a "little village level", easy and fast ( reasonably), and still "looking nice" ( more or less, like the one in the image below)!
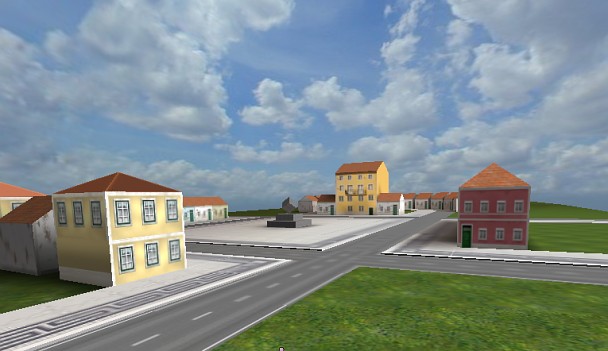
"Looking nice" it's not really important for a game, but, is a good way to motivate people to play your game, if this matters to you!
This will be the second, of a Game Level Design tutorials series, by someone who never have done one ( game)!
You're warned.
If you want to closelly follow the tutorial, you can download the needed textures.
How/where to start?
I like to have a "reference" object and them "build around". The default cube/scene could be our first village house!
Start Blender with the default scene, or add a new "Cube", at the scene center ( x0,y0,z0). Open a "UV/Image editor" window, and, with mouse cursor in the "3D" window, press "F" key to enter "UV Face Select" mode ( with the cube selected).
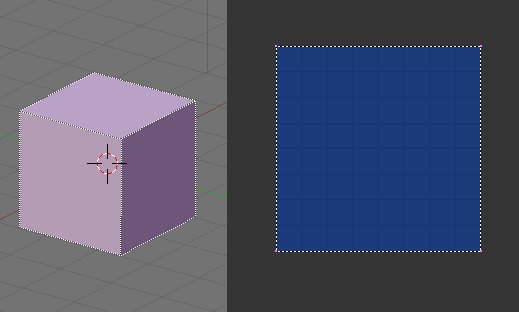
Your screen, should look more or less, like in the image above. Then, in the "UV Editor" window do "Alt-O" keys and browse your file system to load one of the images previously downloaded ( "whitehouselittle.jpg"), or one of your own.
Keep in mind that "good" images/textures for games ( at least blender games), should have a "power of two" size, ex: 256x256 pixels or 128x256 or 128x128 or 64x64 or 64x256 and so on.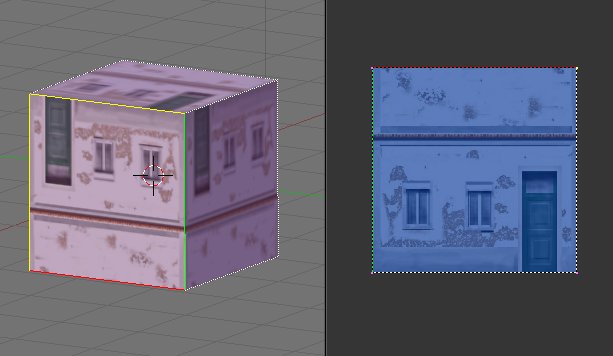 Here's the new screen...please, notice that the texture is "inverted" in some faces...to solve the problem, select the desired faces of the cube and press "R" key twice ( with mouse cursor in the 3D window), choosing each time "UV Co-ordinates" in the "Rotate" menu.
In "Front" view ( "1" in the image above), you can now notice that the image don't "fit well" the front face; our intention, is, to only use the texture zone bellow the roof line, so get rid of the upper area ( 1 to 7 squares).
Here's one solution ( there's others): we'll "cut" the cube, to obtain a face shape similar to the one in the texture; here's how:
Press "Tab" key to enter "Edit Object" mode ( "2" in the image above), "K" key to bring the "Loop/Cut" menu to the scene, choose "Loop Cut", place the mouse cursor near a vertical edge, a pink horizontal line will appear, left mouse click, the line turns yellow, then, move the mouse until the yellow line reach the desired location, and then, left mouse click, again, to apply the "cut".
Back to "Face Select" mode, "Tab" key, select the lower face ( "3"), then, in the "UV Editor" select the two top vertices and move them until they reach the roof line ( "4").

Now select the left, right and back lower faces of the cube as in the image above. In the "UV Editor" select all the vertices, "A" key, and move them as in the right side of the above image.
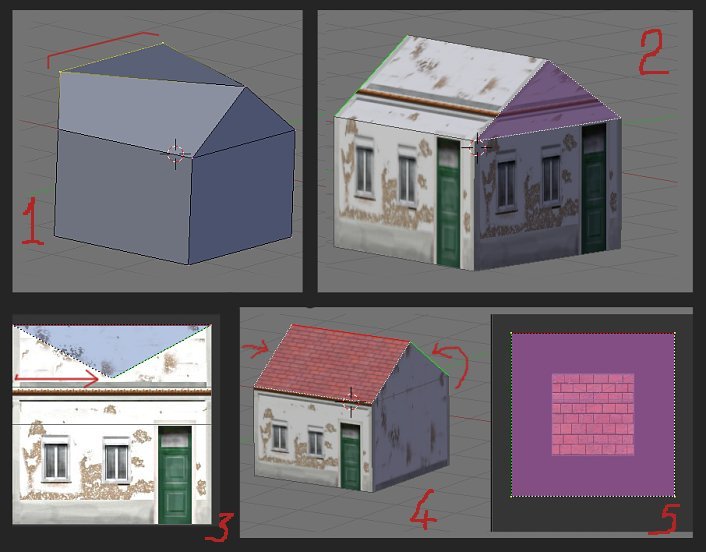
In "Object Edit" mode again ( "1" in the image above), select the two right top vertices, press "W" key, and in the "Specials" menu, choose "Merge", and then "At Center". Do the same in the opposite side.
Now, in "Face Select" mode, select the two triangular faces ( "2"). In the "UV Editor" select all vertices, press "M" key, and choose "Y axis". In the "UV Editor" select the two lower vertices and move them towards the center ( "3"), while pressing "Ctrl" key, the tool bar will display "Dy" coordinates, stop when you reach "0.500".
Now select the two top faces, press "U" key, and in the "UV Calculation" menu, choose "Reset" ( "4").
Then, in the "UV Editor" select all vertices and scale them, "S" key, while pressing "Ctrl" key to "snap" the vertices, and check the tool bar display, stopping when you reach "X, Y: 2.000" ( "5").

Here's the result of our work in "Game" mode. Not bad, for, a more or less five minutes work, I guess?!
That's why I'll try to show, how to do a "little village level", easy and fast ( reasonably), and still "looking nice" ( more or less, like the one in the image below)!
"Looking nice" it's not really important for a game, but, is a good way to motivate people to play your game, if this matters to you!
This will be the second, of a Game Level Design tutorials series, by someone who never have done one ( game)!
You're warned.
If you want to closelly follow the tutorial, you can download the needed textures.
How/where to start?
I like to have a "reference" object and them "build around". The default cube/scene could be our first village house!
Start Blender with the default scene, or add a new "Cube", at the scene center ( x0,y0,z0). Open a "UV/Image editor" window, and, with mouse cursor in the "3D" window, press "F" key to enter "UV Face Select" mode ( with the cube selected).
Your screen, should look more or less, like in the image above. Then, in the "UV Editor" window do "Alt-O" keys and browse your file system to load one of the images previously downloaded ( "whitehouselittle.jpg"), or one of your own.
Keep in mind that "good" images/textures for games ( at least blender games), should have a "power of two" size, ex: 256x256 pixels or 128x256 or 128x128 or 64x64 or 64x256 and so on.
Here's the new screen...please, notice that the texture is "inverted" in some faces...to solve the problem, select the desired faces of the cube and press "R" key twice ( with mouse cursor in the 3D window), choosing each time "UV Co-ordinates" in the "Rotate" menu.In "Front" view ( "1" in the image above), you can now notice that the image don't "fit well" the front face; our intention, is, to only use the texture zone bellow the roof line, so get rid of the upper area ( 1 to 7 squares).
Here's one solution ( there's others): we'll "cut" the cube, to obtain a face shape similar to the one in the texture; here's how:
Press "Tab" key to enter "Edit Object" mode ( "2" in the image above), "K" key to bring the "Loop/Cut" menu to the scene, choose "Loop Cut", place the mouse cursor near a vertical edge, a pink horizontal line will appear, left mouse click, the line turns yellow, then, move the mouse until the yellow line reach the desired location, and then, left mouse click, again, to apply the "cut".
Back to "Face Select" mode, "Tab" key, select the lower face ( "3"), then, in the "UV Editor" select the two top vertices and move them until they reach the roof line ( "4").
Now select the left, right and back lower faces of the cube as in the image above. In the "UV Editor" select all the vertices, "A" key, and move them as in the right side of the above image.
In "Object Edit" mode again ( "1" in the image above), select the two right top vertices, press "W" key, and in the "Specials" menu, choose "Merge", and then "At Center". Do the same in the opposite side.
Now, in "Face Select" mode, select the two triangular faces ( "2"). In the "UV Editor" select all vertices, press "M" key, and choose "Y axis". In the "UV Editor" select the two lower vertices and move them towards the center ( "3"), while pressing "Ctrl" key, the tool bar will display "Dy" coordinates, stop when you reach "0.500".
Now select the two top faces, press "U" key, and in the "UV Calculation" menu, choose "Reset" ( "4").
Then, in the "UV Editor" select all vertices and scale them, "S" key, while pressing "Ctrl" key to "snap" the vertices, and check the tool bar display, stopping when you reach "X, Y: 2.000" ( "5").
Here's the result of our work in "Game" mode. Not bad, for, a more or less five minutes work, I guess?!