Game Level Design II 4
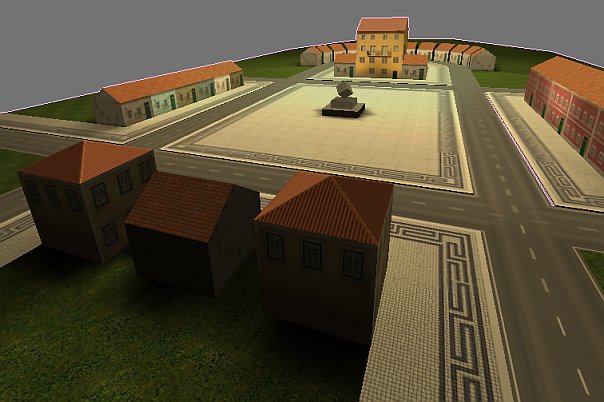
Finally, we've our little level/village ready to use in a game or other!
If you've downloaded my "blend" file, please, open it. Check the "Ve:" and "Fa:" in the "User Preferences" header: "545" and "435". Good number! Almost ridiculous by today standards.
But Blender is an old and peculiar kind of "game engine", so, it's very important to keep the number of polygons low.
Sure, this "game level" it's far from a masterpiece, but it's a real "virtual space", in other words, it's a space, that, even if it "looks ugly", already transmits to the "player/viewer" some kind of "sensation/information", ex: "it's not the sea" or "I'm walking on the street"; and above all, it allows your ideas/stories/characters to "exist" to "be somewhere".
It's already much!
But, we can, easily, make our village looks more atracting, using lights/shadows.
The easiest and fastest way, is, to simply add some lights to the scene ( before, select all the level objects, and "join" them in a single one, with "Ctrl-J" keys), "lamp" or "sun" type, for a global lighting, and "spot" ones, for a more precise illumination, then, enable "light" in "UV Face select" mode for all the desired faces ( all the faces of the level in our case, remember to press the "Copy Draw" button after this).
The image above show a simple light setup for a kind of "hot sunny day".
Here in "game" mode.
But, unless you need real time light for static objects ( simulate day/night changes for ex.), its a waste of "processor power" to use this method.
We can "transform" the real time lighting in "Vertex Painting" shading. Just select the level object and press "V" key twice.
Normally, the level lighting should slightly change, if not, verify in the "Editing" buttons, "F9", in the "Mesh" panel, if there's already a "Vertex Color" field; if yes, delete it, and press "V" again.
The image above shows the result of the "Vertex Painting" use.
We can fine tune the "painted light", pressing "V" key again, then in the "Paint" panel set the "Mul:" or/and "Gamma:" to the desired values, and then, press the "Set" button, one or several times ( values bigger than "1.0" will brighten the object, values lower than "1.00" will darker).
The level state, in the image above, its already quite nice, I think, enough for many people and many games.
But, it's true, "shadows" add a little extra "step of deepness"; no problem, we'll use the, somewhat mysterious, "radiosity" illumination technique to give shadows to our level.
To calculate "radiosity" illumination, Blender don't use lamps ( you can delete them), instead it uses the "emit" properties of a Blender standard "Material", so we'll need an object that carries a "Material" with "emit" properties. It can be a basic plane, for example!
Add a "Plane" to the scene ( with "3D" cursor centered), scale it to "X, Y:20.00" and place it at "LocZ:100.00" ( image above).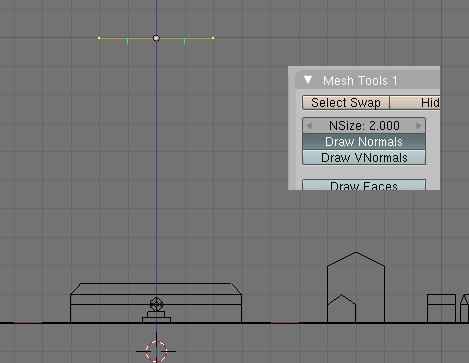
Enter "Edit mode", select all vertices and "Subdivide", "W" key. Check if "normals" ( little blue lines in the image above), are pointing downward ( probably don't), and if not, do "W" key, and choose "Flip Normals" in the "Specials" menu.
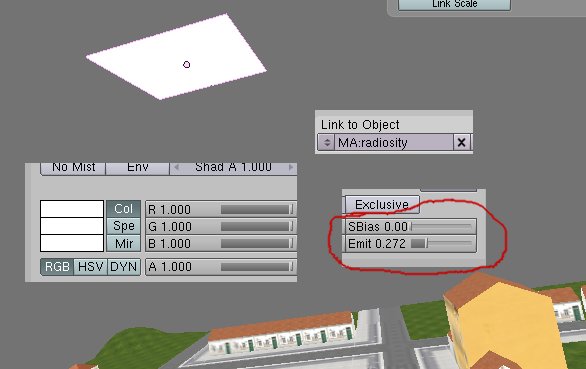
Now assign a new "Material" to the plane, color white, "R,G,B:1.00", name it "radiosity" for example, and, the most important step, set "Emit" to a value different from "0.000", in our case "0.272" ( image above).
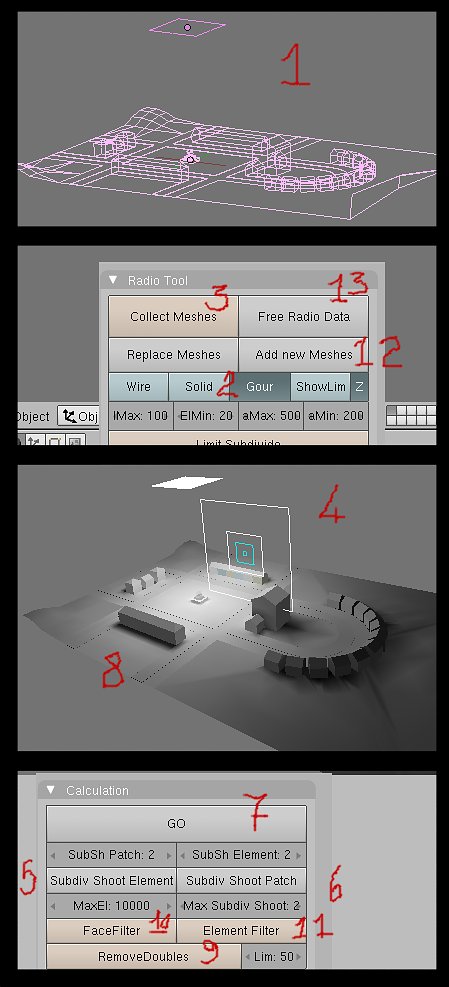
Let's go! "Radiosity" in thirteen steps ( image above)!
"1", select all the objects that should be affected by the "radiosity solution" ( only "mesh" type ones).
"2", Enable "Gouraud" draw mode.
"3", press the "Collect Meshes" button.
"4", the scene/objects turns grey, with some kind of square target in the middle.
"5", the "Subdiv Shoot Element" can add a little bit of realism, just try it.
"6", again, this button can add a little more precision to the "solution", but, as the previous one, avoid it, if you want the lowest possible number of polygons.
"7", press the "Go" button.
"8", the "radiosity engine" starts the calculation process. You can/must survey it in the "3D window", it'll take more or less time depending on the processor's power. You can stop it at any time with the "Esc" key.
"9", when done, set "Lim:" to his higher value and press the "Remove Doubles" button. This is used to reduce the number of polygons.
"10", check the grey shading of your level object, if its very irregular, this means too many polys. Press the "Face Filter" button once or even twice.
"11", and then the "Element Filter".
"12", now press the "Add New Meshes" button, to create a new object. This way, the original one is always available to make other "radiosity" experiments.
"13", finally, press the "Free Radio Data" to stop the "radiosity engine".
The new object with the "radiosity solution" will overlap the original one, you should move it away.
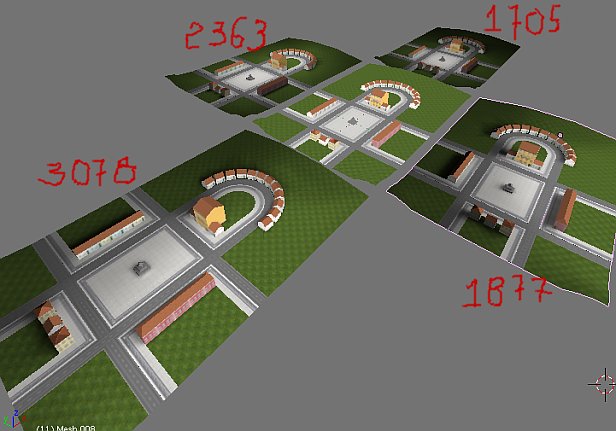
The image above shows different "solution" tests, with different settings. As you can notice, with a very different amount of vertices, we can get more or less the same visual quality.
There's many, many parameters to tune the "radiosity solution". You can change the size, the shape and the placement of the "emiter" object. The "emit" material's color too, as in the image above ( light orange). The number of "emiter" objects and their orientation change the "solution" too. You can download a blend file with differents "radiosity solutions".
If you've downloaded my "blend" file, please, open it. Check the "Ve:" and "Fa:" in the "User Preferences" header: "545" and "435". Good number! Almost ridiculous by today standards.
But Blender is an old and peculiar kind of "game engine", so, it's very important to keep the number of polygons low.
Sure, this "game level" it's far from a masterpiece, but it's a real "virtual space", in other words, it's a space, that, even if it "looks ugly", already transmits to the "player/viewer" some kind of "sensation/information", ex: "it's not the sea" or "I'm walking on the street"; and above all, it allows your ideas/stories/characters to "exist" to "be somewhere".
It's already much!
But, we can, easily, make our village looks more atracting, using lights/shadows.
The easiest and fastest way, is, to simply add some lights to the scene ( before, select all the level objects, and "join" them in a single one, with "Ctrl-J" keys), "lamp" or "sun" type, for a global lighting, and "spot" ones, for a more precise illumination, then, enable "light" in "UV Face select" mode for all the desired faces ( all the faces of the level in our case, remember to press the "Copy Draw" button after this).
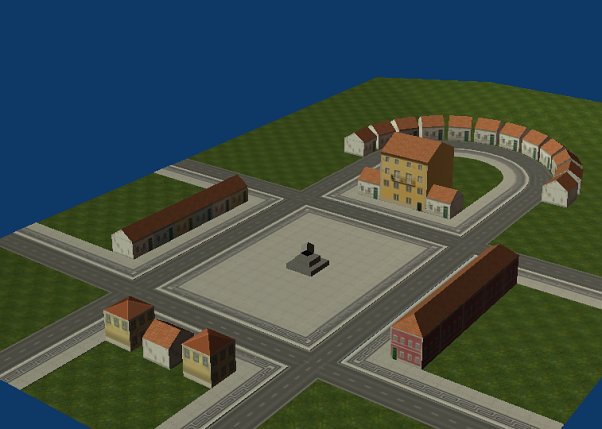
The image above show a simple light setup for a kind of "hot sunny day".
Here in "game" mode.
But, unless you need real time light for static objects ( simulate day/night changes for ex.), its a waste of "processor power" to use this method.
We can "transform" the real time lighting in "Vertex Painting" shading. Just select the level object and press "V" key twice.
Normally, the level lighting should slightly change, if not, verify in the "Editing" buttons, "F9", in the "Mesh" panel, if there's already a "Vertex Color" field; if yes, delete it, and press "V" again.
The image above shows the result of the "Vertex Painting" use.
We can fine tune the "painted light", pressing "V" key again, then in the "Paint" panel set the "Mul:" or/and "Gamma:" to the desired values, and then, press the "Set" button, one or several times ( values bigger than "1.0" will brighten the object, values lower than "1.00" will darker).
The level state, in the image above, its already quite nice, I think, enough for many people and many games.
But, it's true, "shadows" add a little extra "step of deepness"; no problem, we'll use the, somewhat mysterious, "radiosity" illumination technique to give shadows to our level.
To calculate "radiosity" illumination, Blender don't use lamps ( you can delete them), instead it uses the "emit" properties of a Blender standard "Material", so we'll need an object that carries a "Material" with "emit" properties. It can be a basic plane, for example!
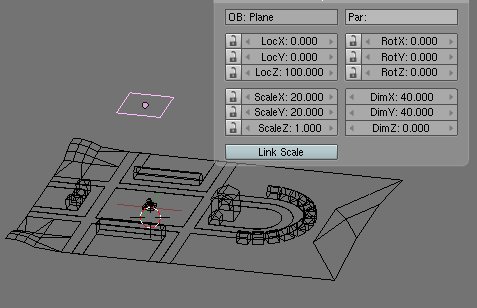
Add a "Plane" to the scene ( with "3D" cursor centered), scale it to "X, Y:20.00" and place it at "LocZ:100.00" ( image above).
Enter "Edit mode", select all vertices and "Subdivide", "W" key. Check if "normals" ( little blue lines in the image above), are pointing downward ( probably don't), and if not, do "W" key, and choose "Flip Normals" in the "Specials" menu.
Now assign a new "Material" to the plane, color white, "R,G,B:1.00", name it "radiosity" for example, and, the most important step, set "Emit" to a value different from "0.000", in our case "0.272" ( image above).
Let's go! "Radiosity" in thirteen steps ( image above)!
"1", select all the objects that should be affected by the "radiosity solution" ( only "mesh" type ones).
"2", Enable "Gouraud" draw mode.
"3", press the "Collect Meshes" button.
"4", the scene/objects turns grey, with some kind of square target in the middle.
"5", the "Subdiv Shoot Element" can add a little bit of realism, just try it.
"6", again, this button can add a little more precision to the "solution", but, as the previous one, avoid it, if you want the lowest possible number of polygons.
"7", press the "Go" button.
"8", the "radiosity engine" starts the calculation process. You can/must survey it in the "3D window", it'll take more or less time depending on the processor's power. You can stop it at any time with the "Esc" key.
"9", when done, set "Lim:" to his higher value and press the "Remove Doubles" button. This is used to reduce the number of polygons.
"10", check the grey shading of your level object, if its very irregular, this means too many polys. Press the "Face Filter" button once or even twice.
"11", and then the "Element Filter".
"12", now press the "Add New Meshes" button, to create a new object. This way, the original one is always available to make other "radiosity" experiments.
"13", finally, press the "Free Radio Data" to stop the "radiosity engine".
The new object with the "radiosity solution" will overlap the original one, you should move it away.
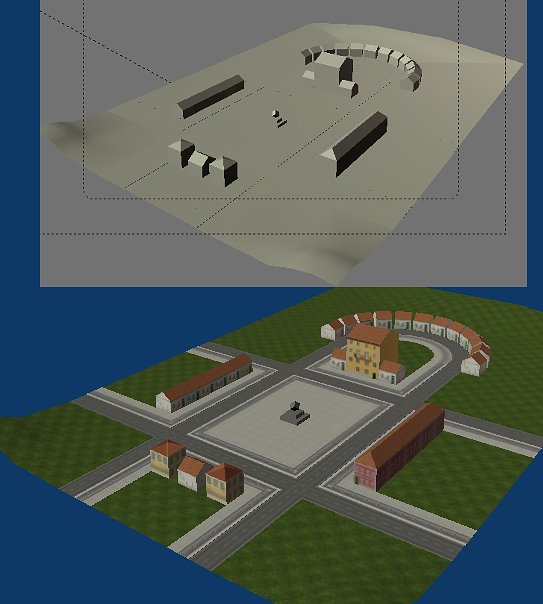
The image above shows different "solution" tests, with different settings. As you can notice, with a very different amount of vertices, we can get more or less the same visual quality.
There's many, many parameters to tune the "radiosity solution". You can change the size, the shape and the placement of the "emiter" object. The "emit" material's color too, as in the image above ( light orange). The number of "emiter" objects and their orientation change the "solution" too. You can download a blend file with differents "radiosity solutions".