GIMP it 4
If you've managed to get over here, probably you can handle the rest of the texture job.
In this chapter I'll show how to do some more sophisticated actions. But in a simple manner. As in Blender, most of the times, only three or four basic tools are enough to do "the job", if you know them well.
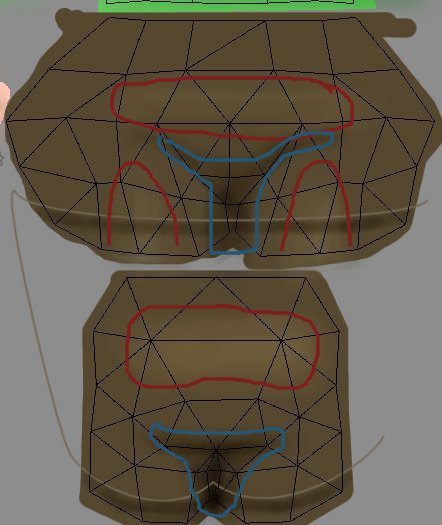
Now we'll paint the shorts. On another layer ( or in the "shirt" one), paint, with a medium brown the front and back "shorts faces"area.
Give some lighten strokes ( Dodge tool) as in the image above, red lines, and darken a little the blue line zones. With the "Path tool", "stroke" a light brown line, as in the image above, to fake the shorts legs hem.
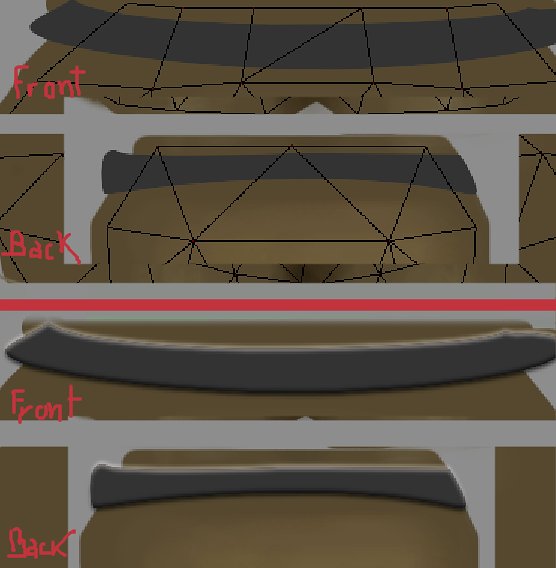
The belt and his buckle it'll be our little "jewel in the crowd". Add another transparent layer, name it "belt", and with the "Path tool" draw two shapes more or less like in the image above, top side, and fill them with a dark grey color.
Duplicate this layer, name it "belt bumpmap", and apply a "blur" filter to it, "Filters -> Blur -> Gaussian Blur" with the default settings. Disable the "eye icon" to make the layer invisible. Select the "belt" layer.
Now, go to the "Filters" menu, and in the "Map" sub-section choose the "Bump map" one, to give thickness to the belt. In the filter dialog box, in the "Bump Map" field, search for the "belt bump map" name. Enable "Compensate for darkening", set "Azimuth" value to "90", and play with "Elevation", "Depth" and "Waterlevel" settings until the belt shape in the preview window have a "thickness", ( a "light" area above, and a "shadow" one below). It should look more or less like in the image above, bottom side.
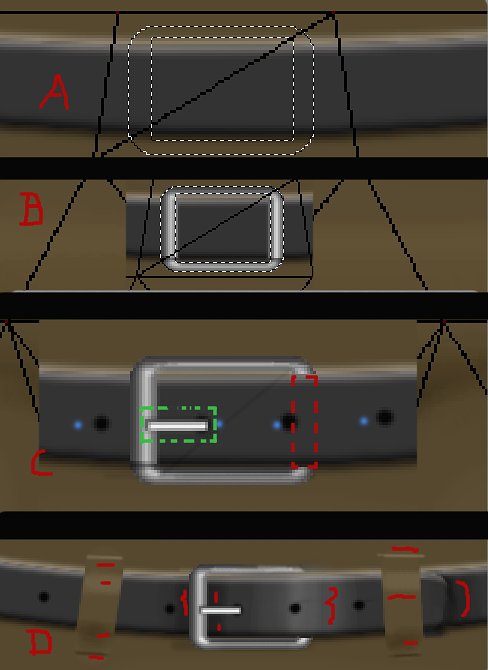
The buckle now. Add a new transparent layer above the "belt" one, and draw a "rectangular selection" in the middle of the top front shorts faces . In the "Selection" menu, choose "Rounded Rectangle" and set the "Radius" value to "30". Then, press "Ctrl" key, and, while holding it, draw, inside the selection, another rectangular one, a little smaller ( -A- in the image above).
Note, that I always work "free-hand", it's "my way". You can do a much more precise work using the "guides" lines and "rulers".
Fill the new selection with a "metallic gradient" ( Brushed Aluminium? Default?), with the "Shapeburst ( dimpled)" "Shape" option ( -B- in the image above).
As in -C-, draw a little "rectangular selection" ( green line) and fill it as in the previous step. Erase the buckle part that its supposed to be behind the belt ( red line). With the "Paintbrush tool" add some black "one stroke" "holes" ( blue dots).
With a big brush add the little "pieces" of cloth that keep the belt in place ( -D- in the image above). Add some "lighten/darken" strokes to simulate the belt volume behind, and do the same in the belt painting ( red lines in the image above).

To paint the legs, do the usual pink base work, in the "flesh" layer, and paint the white "socks" over it, as in the bottom side of the image above.
Some light "strokes" of "Dodge/Burn" tool will "spice" the "flat pink.
Then, in the "shorts" layer, with the same brown color, paint the bottom side of the shorts legs. Don't forget to "lighten" the front legs faces as in the previous shorts step.
It looks like the end, but, it's not, sorry!
Once again, save your work in ".XCF" format, then "flatten" the image and save it with the desired dimensions, format and name ( to me, the default, "Quality : 85" JPG format, its a good option to use in Blender).
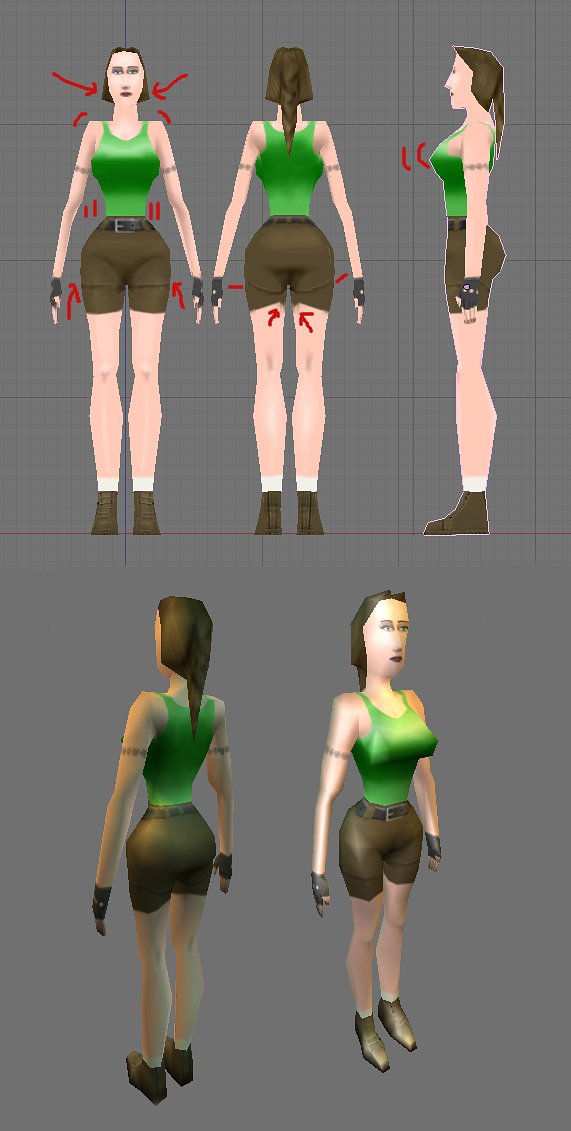
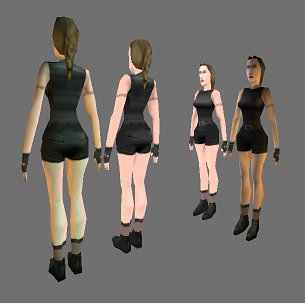
With the "new" texture loaded ( or replaced) in Blender's model, we can check for errors or not gracious zones. In the image above I've underlined some of the most obvious ones, to my taste ( maybe your character/texture looks more or less like mine):
weird hair shape, "stiff" shoulders, too big chest, belt too narrow in the back, shorts legs not well aligned.

Here's our character after the corrections. Looks better, I guess?!
Download the final version of the textured character model.
The nice thing after all this work, is, that you can quite easily change the appearance of your character.
Final words; once again, I've tried to demonstrate one way to obtain nice results ( in my opinion) in a quite fast and simple manner. There's more "better/orthodox" ways to do the same work. But all this is quite conventional.
Another way is to forget all this and "Gimp it" as you "feel it".
Go ahead!
In this chapter I'll show how to do some more sophisticated actions. But in a simple manner. As in Blender, most of the times, only three or four basic tools are enough to do "the job", if you know them well.
Now we'll paint the shorts. On another layer ( or in the "shirt" one), paint, with a medium brown the front and back "shorts faces"area.
Give some lighten strokes ( Dodge tool) as in the image above, red lines, and darken a little the blue line zones. With the "Path tool", "stroke" a light brown line, as in the image above, to fake the shorts legs hem.
The belt and his buckle it'll be our little "jewel in the crowd". Add another transparent layer, name it "belt", and with the "Path tool" draw two shapes more or less like in the image above, top side, and fill them with a dark grey color.
Duplicate this layer, name it "belt bumpmap", and apply a "blur" filter to it, "Filters -> Blur -> Gaussian Blur" with the default settings. Disable the "eye icon" to make the layer invisible. Select the "belt" layer.
Now, go to the "Filters" menu, and in the "Map" sub-section choose the "Bump map" one, to give thickness to the belt. In the filter dialog box, in the "Bump Map" field, search for the "belt bump map" name. Enable "Compensate for darkening", set "Azimuth" value to "90", and play with "Elevation", "Depth" and "Waterlevel" settings until the belt shape in the preview window have a "thickness", ( a "light" area above, and a "shadow" one below). It should look more or less like in the image above, bottom side.
The buckle now. Add a new transparent layer above the "belt" one, and draw a "rectangular selection" in the middle of the top front shorts faces . In the "Selection" menu, choose "Rounded Rectangle" and set the "Radius" value to "30". Then, press "Ctrl" key, and, while holding it, draw, inside the selection, another rectangular one, a little smaller ( -A- in the image above).
Note, that I always work "free-hand", it's "my way". You can do a much more precise work using the "guides" lines and "rulers".
Fill the new selection with a "metallic gradient" ( Brushed Aluminium? Default?), with the "Shapeburst ( dimpled)" "Shape" option ( -B- in the image above).
As in -C-, draw a little "rectangular selection" ( green line) and fill it as in the previous step. Erase the buckle part that its supposed to be behind the belt ( red line). With the "Paintbrush tool" add some black "one stroke" "holes" ( blue dots).
With a big brush add the little "pieces" of cloth that keep the belt in place ( -D- in the image above). Add some "lighten/darken" strokes to simulate the belt volume behind, and do the same in the belt painting ( red lines in the image above).
To paint the legs, do the usual pink base work, in the "flesh" layer, and paint the white "socks" over it, as in the bottom side of the image above.
Some light "strokes" of "Dodge/Burn" tool will "spice" the "flat pink.
Then, in the "shorts" layer, with the same brown color, paint the bottom side of the shorts legs. Don't forget to "lighten" the front legs faces as in the previous shorts step.
It looks like the end, but, it's not, sorry!
Once again, save your work in ".XCF" format, then "flatten" the image and save it with the desired dimensions, format and name ( to me, the default, "Quality : 85" JPG format, its a good option to use in Blender).
With the "new" texture loaded ( or replaced) in Blender's model, we can check for errors or not gracious zones. In the image above I've underlined some of the most obvious ones, to my taste ( maybe your character/texture looks more or less like mine):
weird hair shape, "stiff" shoulders, too big chest, belt too narrow in the back, shorts legs not well aligned.
Here's our character after the corrections. Looks better, I guess?!
Download the final version of the textured character model.
The nice thing after all this work, is, that you can quite easily change the appearance of your character.
Final words; once again, I've tried to demonstrate one way to obtain nice results ( in my opinion) in a quite fast and simple manner. There's more "better/orthodox" ways to do the same work. But all this is quite conventional.
Another way is to forget all this and "Gimp it" as you "feel it".
Go ahead!