GIMP it 3
If you've managed to get over here, probably you can handle the rest of the texture tutorial/job.

In a way, painting the face was quite simple. We've worked "inside" a solid color zone ( flesh's pink one), this meaning that we're not worried about how different poly's/faces will interact between them.
It's probably the greatest difficulty of doing 3D textures, making the "paint work" crosses different groups of faces seamlessly; that's why a good "unwrap" work its fundamental to obtain a nice texture.
But painting the torso area it'll be a different story, because, now, we'll work on separate adjacent edges/faces.
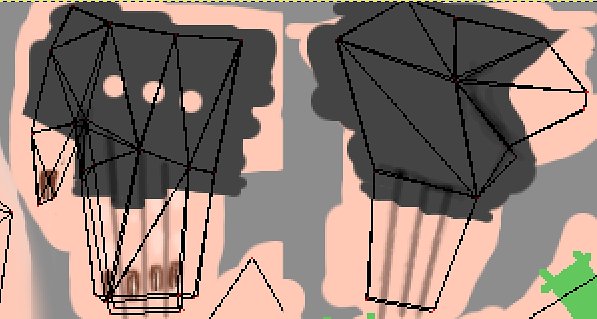
In the image above, I've added some colored dots to help you to visualize which faces have adjacent edges and where they are. You must verify, for example, that the "red dot" face ( at right in the image above), will have the same pink color ( at least in the top area over the edge), as the "red dot" bottom poly in the face area.
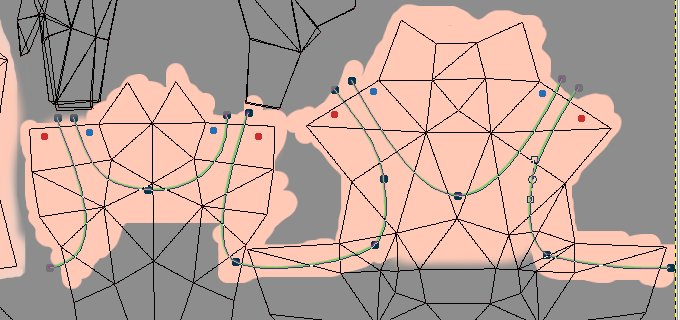
Let's paint the torso and shirt. In the "skin" layer, paint, with the same pink previously used in the face, a shape more or less like in the image above.
Add a new transparent layer, rename it "shirt", then, with the "Path tool", draw a path with five sections, more or less like in the image above ( green lines with dark nodes). The important thing here, is, the red and blue dot's edge lenght should be exactly the same.
At least one problem its quite evident: the "shoulders" top edges at left are almost horizontal, whereas the same ones in the right side are in a 45° angle ( bad unwrap work), and, at least, the red lenght is bigger in the right side.
Back to our path, activate it if not done, choose a "light green" color that you like, choose a "5x5 soft brush" and "Stroke" the path with a "Brush" tool ( as we previously did).

Still in the "shirt layer", with the same green as in the previous step, draw straight lines to "close" the path ones, and to surround the bottom torso area ( image above).
Useful tip: to draw "free-hand" straight lines, "Left-mouse click" in the desired location, then, hold "Shift" key, a line will appear, and "Left-mouse click" again in the other desired position. If you hold "Ctrl key" too, the line will be "constrained" by "15°" steps. The "straight line" its always active ( until you change the tool), in other words, you can draw one or more segments, make a pause, and then, just hold "Shift" key and keep drawing the line.
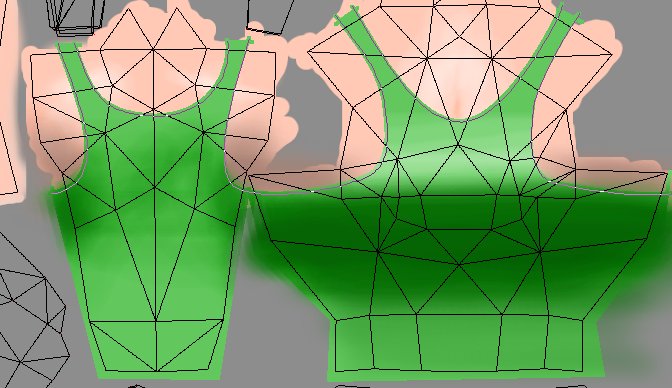
With the "Bucket Fill tool" fill the torso shapes. If your "closing" work previously made was well done, the green color will fill perfectly ( or almost, some times some artifacts remain, so, zoom, check, and refill if necessary) the area ( image above).
Now with a quite big "Soft brush" and the "Dodge/Burn tool", in "Midtones Mode" and little "Exposure" value ( 18?), darken the breast zone to fake shadow shading first in the "front torso" faces ( right side in the image above). Then do the same in the "back torso" area ( left side in the image above), until at least, the adjacent faces will get the same dark green. Now, lighten a little bit the top breast area.
Then, select the "skin" layer and lightly darken or lighten the skin color, to match the shirt work previously made ( use the image above as a guide).

Here's how the torso painting will appear in the 3D model. As you can see in the "insert", the shoulder zone presents a texture problem: the green lines aren't correctly aligned. Sometimes its possible to correct this kind of errors, moving slightly, in the "UV Editor", the concerned vertices, one at a time.
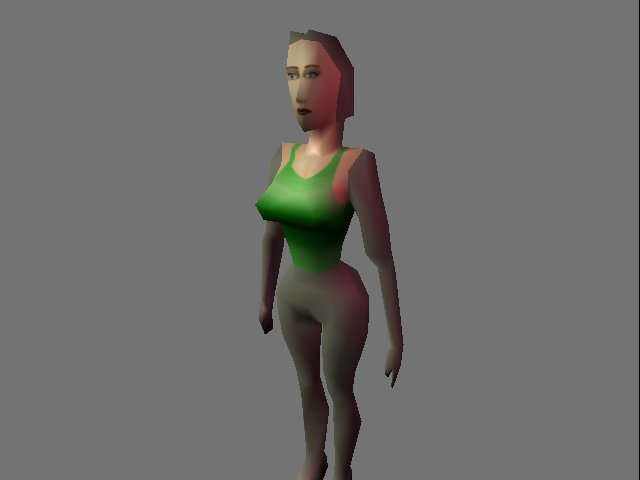
Depending of your game/demo style, some "weaknesses" of the character modelling or texture could be hidden, for example, with some dynamic colored lights as in the image above.
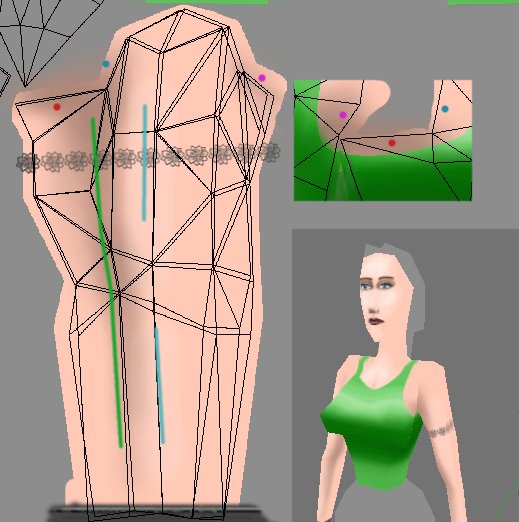
Painting the arms it'll be easy. In the "skin" layer, "fill/paint" the arm's faces zone, with the "pink" color, as usual. Then we must match the same shadow shading as in the "torso" adjacent faces ( dotted colors in the image above). To do this, first select the "Color Picker tool" and in the "Tool options panel" enable "Sample Merged" to allow the color picker to pick colors in all visible layers, then switch to "Airbrush tool" and pick a color in the torso face near the edge ( left-mouse click while pressing Ctrl key), then paint in the arm's adjacent face near the edge too and do the same for the others edges/faces. The difficulty here, its that the "Airbrush tool" will not paint exactly the same color with one stroke, as the one we've just picked. One way to solve this problem it's to apply the color over the edge border with the "Paintbrush" and then, continuing with the "Airbrush tool" or maybe with the "Smudge" one.
Then do the usual "Lighten" ( blue lines) and "Darken" ( green lines) steps. At the bottom of the arms paint a grey straight line, this will be the gloves.
The flower tattoos? It's just one of the many built-in Gimp brushes, used with a dark grey color. Probably you must set the "Spacing" value to "100" in the "Brush Dialog window".
No particular difficulty to paint the hands/gloves.
Pink base in the "flesh" layer, then in another layer, with the same grey as in the previous arms step, freely painted the gloves, make the "holes" with three "Eraser" strokes, and with a darker grey, fake some shadows.
Then in the "flesh" layer with a medium brown, I've made the finger's lines and nails. To "spice up" the nails, just some "Dodge/Burn" strokes with a tiny brush are needed.

The boots could look a bit complicated to achieve, but when decomposed in "steps" they're a pleasure to do. Add a "transparent layer and paint the "shoes" area with a medium brown ( the same as the shorts one?). Then add a little noise, "Filters -> Noise -> Scatter RGB value: 0.12" and smooth it, " Filters -> Blur -> Gaussian Blur value: 6".
Then with the "Paintbrush tool",a soft brush and a darker brown color, draw straight lines ( remember the Shift key?) to fake shadows, more or less like in the image above ( red lines). Then with a smaller brush and a lighter brown color, paint, slightly over the previous lines to fake "highlights". Paint the "holes" with black color before the boot-laces.
Some "darken" and lighten strokes will finnish the work.
Making the hair could be a hard task. I'll try to show here an easy and fast way that still looks quite nice, I hope.
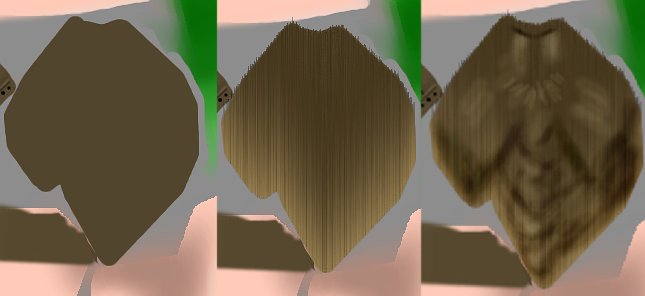
In a new transparent layer ( if you have memory problems - too many layers?, use the "Merge Down" function in the "Layers menu" to merge the selected layer with the one below it), paint the hair faces zone with the desired color ( same brown color as the shorts one? Image above at left), make a layer copy, apply "Filters -> Noise -> Scatter HSV -> Holdness:2, Hue:0, Saturation:49, Value:30", in the new layer, turn it 90° ( Layers -> Transform -> Rotate 90 degrees CW), and apply "Filters -> Distortion -> Wind -> -Wind, -Left, -Trailing, Threshold:2, Strenght:34).
When done, turn the layer again but backward, "Layers -> Transform -> Rotate 90 degrees CCW", and merge it down ( image above at center).
Then, again, do the usual "lighten/darken" work ( image above at right).
Here's the actual state of our texture when "mapped" on Blender's model.
In a way, painting the face was quite simple. We've worked "inside" a solid color zone ( flesh's pink one), this meaning that we're not worried about how different poly's/faces will interact between them.
It's probably the greatest difficulty of doing 3D textures, making the "paint work" crosses different groups of faces seamlessly; that's why a good "unwrap" work its fundamental to obtain a nice texture.
But painting the torso area it'll be a different story, because, now, we'll work on separate adjacent edges/faces.
In the image above, I've added some colored dots to help you to visualize which faces have adjacent edges and where they are. You must verify, for example, that the "red dot" face ( at right in the image above), will have the same pink color ( at least in the top area over the edge), as the "red dot" bottom poly in the face area.
Let's paint the torso and shirt. In the "skin" layer, paint, with the same pink previously used in the face, a shape more or less like in the image above.
Add a new transparent layer, rename it "shirt", then, with the "Path tool", draw a path with five sections, more or less like in the image above ( green lines with dark nodes). The important thing here, is, the red and blue dot's edge lenght should be exactly the same.
At least one problem its quite evident: the "shoulders" top edges at left are almost horizontal, whereas the same ones in the right side are in a 45° angle ( bad unwrap work), and, at least, the red lenght is bigger in the right side.
Back to our path, activate it if not done, choose a "light green" color that you like, choose a "5x5 soft brush" and "Stroke" the path with a "Brush" tool ( as we previously did).
Still in the "shirt layer", with the same green as in the previous step, draw straight lines to "close" the path ones, and to surround the bottom torso area ( image above).
Useful tip: to draw "free-hand" straight lines, "Left-mouse click" in the desired location, then, hold "Shift" key, a line will appear, and "Left-mouse click" again in the other desired position. If you hold "Ctrl key" too, the line will be "constrained" by "15°" steps. The "straight line" its always active ( until you change the tool), in other words, you can draw one or more segments, make a pause, and then, just hold "Shift" key and keep drawing the line.
With the "Bucket Fill tool" fill the torso shapes. If your "closing" work previously made was well done, the green color will fill perfectly ( or almost, some times some artifacts remain, so, zoom, check, and refill if necessary) the area ( image above).
Now with a quite big "Soft brush" and the "Dodge/Burn tool", in "Midtones Mode" and little "Exposure" value ( 18?), darken the breast zone to fake shadow shading first in the "front torso" faces ( right side in the image above). Then do the same in the "back torso" area ( left side in the image above), until at least, the adjacent faces will get the same dark green. Now, lighten a little bit the top breast area.
Then, select the "skin" layer and lightly darken or lighten the skin color, to match the shirt work previously made ( use the image above as a guide).
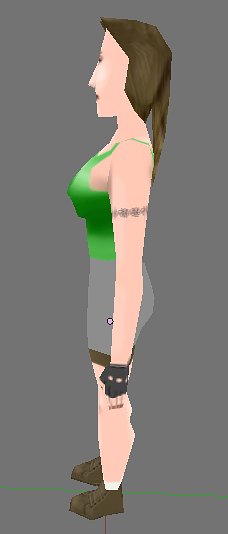
Here's how the torso painting will appear in the 3D model. As you can see in the "insert", the shoulder zone presents a texture problem: the green lines aren't correctly aligned. Sometimes its possible to correct this kind of errors, moving slightly, in the "UV Editor", the concerned vertices, one at a time.
Depending of your game/demo style, some "weaknesses" of the character modelling or texture could be hidden, for example, with some dynamic colored lights as in the image above.
Painting the arms it'll be easy. In the "skin" layer, "fill/paint" the arm's faces zone, with the "pink" color, as usual. Then we must match the same shadow shading as in the "torso" adjacent faces ( dotted colors in the image above). To do this, first select the "Color Picker tool" and in the "Tool options panel" enable "Sample Merged" to allow the color picker to pick colors in all visible layers, then switch to "Airbrush tool" and pick a color in the torso face near the edge ( left-mouse click while pressing Ctrl key), then paint in the arm's adjacent face near the edge too and do the same for the others edges/faces. The difficulty here, its that the "Airbrush tool" will not paint exactly the same color with one stroke, as the one we've just picked. One way to solve this problem it's to apply the color over the edge border with the "Paintbrush" and then, continuing with the "Airbrush tool" or maybe with the "Smudge" one.
Then do the usual "Lighten" ( blue lines) and "Darken" ( green lines) steps. At the bottom of the arms paint a grey straight line, this will be the gloves.
The flower tattoos? It's just one of the many built-in Gimp brushes, used with a dark grey color. Probably you must set the "Spacing" value to "100" in the "Brush Dialog window".
No particular difficulty to paint the hands/gloves.
Pink base in the "flesh" layer, then in another layer, with the same grey as in the previous arms step, freely painted the gloves, make the "holes" with three "Eraser" strokes, and with a darker grey, fake some shadows.
Then in the "flesh" layer with a medium brown, I've made the finger's lines and nails. To "spice up" the nails, just some "Dodge/Burn" strokes with a tiny brush are needed.
The boots could look a bit complicated to achieve, but when decomposed in "steps" they're a pleasure to do. Add a "transparent layer and paint the "shoes" area with a medium brown ( the same as the shorts one?). Then add a little noise, "Filters -> Noise -> Scatter RGB value: 0.12" and smooth it, " Filters -> Blur -> Gaussian Blur value: 6".
Then with the "Paintbrush tool",a soft brush and a darker brown color, draw straight lines ( remember the Shift key?) to fake shadows, more or less like in the image above ( red lines). Then with a smaller brush and a lighter brown color, paint, slightly over the previous lines to fake "highlights". Paint the "holes" with black color before the boot-laces.
Some "darken" and lighten strokes will finnish the work.
Making the hair could be a hard task. I'll try to show here an easy and fast way that still looks quite nice, I hope.
In a new transparent layer ( if you have memory problems - too many layers?, use the "Merge Down" function in the "Layers menu" to merge the selected layer with the one below it), paint the hair faces zone with the desired color ( same brown color as the shorts one? Image above at left), make a layer copy, apply "Filters -> Noise -> Scatter HSV -> Holdness:2, Hue:0, Saturation:49, Value:30", in the new layer, turn it 90° ( Layers -> Transform -> Rotate 90 degrees CW), and apply "Filters -> Distortion -> Wind -> -Wind, -Left, -Trailing, Threshold:2, Strenght:34).
When done, turn the layer again but backward, "Layers -> Transform -> Rotate 90 degrees CCW", and merge it down ( image above at center).
Then, again, do the usual "lighten/darken" work ( image above at right).
Here's the actual state of our texture when "mapped" on Blender's model.