GIMP it 2
Ah! At least, we'll work with the famous GIMP...hum, not yet, sorry. Let me give you some tips/advices first.
First of all, be kind with Gimp developers ( and with me too), and never pronounce the word Photoshop™ © ® ( the first and last time I'll use it here).
Yes, The Gimp it's a clone ( at the beginning of his history at least), but, unlike his famous model, The Gimp its high-quality software suitable for poor people ( well, for the others too).
Of course, all's not perfect, and The Gimp have some "weak" points, "memory management" being one.
You'll need lots of "RAM memory", 128 Mb being a drastic minimum, and 256 Mb barely enough to work with big size images. Of course, you can still work in these conditions ( luckily), but "hard disk swap" will became frequent and a bit annoying.
Here's' some ways to optimize your work with The Gimp, tuning the "Preferences dialog" in the "File menu" of the "Main Toolbox":
In the "Environment" section, set "Tile cache size", if you're in the 128 Mb condition, to "100" and close all the other programs while working with the Gimp.
You can change the "Minimal number of Undo levels", to, at least a value of "10"; it's not really important, but quite useful.
The other important tip its about keyboard shortcuts. They're really a precious help, so, memorise or change them to suit your needs, the most used ones, for ex., "Move", "Rectangular Selection", "Paintbrush", "Airbrush", "Smudge" and "Burn/Dodge", "Zoom In", "Zoom Out", etc.

So, time to work. Start the Gimp. Open the "guide" TGA image saved with Blender. This will be the background layer. We'll not use it anymore, you can disable the "Eye icon" or even delete it ( after the next step). Make a copy of the "background" layer, name it "guide" and change it's "Mode" to "Multiply", as in the above image at right ( yes, I have a french language Gimp).
The "Multiply mode will "cut off" the white color of the "guide" image, leaving the black lines untouched. You must keep on mind, that this layer, should always stay on top of the others.
Now, add a new "white" layer, rename it ( "base"?), fill it with a medium grey, and place it between the other two; this layer isn't really necessary, but I like to work this way.
Select the grey layer. Add a new "Transparent" layer, and rename it, "flesh" or "skin" or something like that. In this layer we'll paint the skin color base.
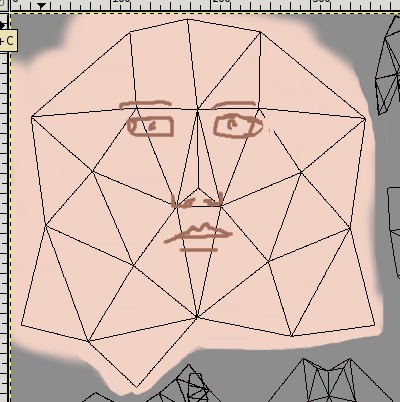
Choose a medium rose color, and paint by hand ( or draw a selection and fill it), the face poly's zone as in the image above. Most of the time it's quite hard to visualize where to paint ( or place) the details, like the eyes or mouth, so it's a good idea to have Blender opened with the character model in "Face Select mode", so you can check the position of the poly's.
Here I've drawn the position of the face's elements ( brown lines in the image above) to help you to visualize.

Add another transparent layer, rename it "Face elements", and place it above the "skin" one.
Choose a white color, choose a "5x5" soft brush, then pick the "Ellipse Selection" tool, draw an horizontal elliptical selection, more or less like in the image above, and fill it.
Choose a dark brown color, do "Right-mouse click" over the window to make the menu appear, choose "Edit", then "Stroke Selection", and in the "Dialog box" choose "Stroke using a Paint tool" and verify that the "Paintbrush" is the one that appears in the "Paint Tool" box, then "OK".
You should have now a dark brown line that surrounds the selection.
Menu -> Selection -> None.
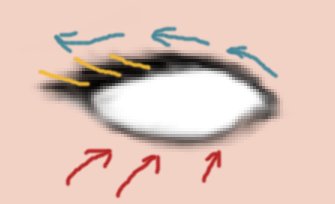
Now, instead of painting, we'll "blend" colors. Pick the "Smudge" tool ( the finger one) and a quite big soft brush ( more or less 1/3 as big as the eye) and give some strokes ( red arrows in the image above) to blend the brown and white colors.
Then, with horizontal strokes over the white color, "clean/rebuild" the eye shape. Play with the "Brush" size and the "Rate" tool option to get a smooth result/feeling.
To "paint" the eyelashes, "smudge" over the top brown line ( blue arrows), but now, don't blend much the colors, avoid to go over the white color. With a little brush draw some brown lines ( yellow lines) and do more smudge work now with a hard brush to define some eyelash lines.
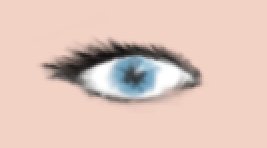
To make the iris and pupil, just paint with a soft brush some strokes in the center of the eye with a blue color, give them a loose round shape, change to a black color, place a stroke in the middle of the blue circle - this will be the pupil, smudge it a bit, and with the "Dodge" tool ( the "black point"? icon) light the top intersection of the black and blue colors, until a white point appear ( image above).
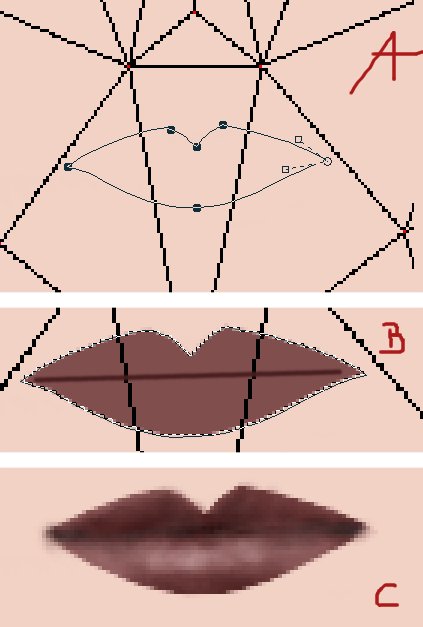
Now, the mouth. We'll use the "Path tool" ( the pen with a line icon). Under the nose triangle face, place six nodes, more or less like in the image above.
It's not needed to be accurate while in "Design" mode, we'll edit them later.
When you've placed the fifth node, to close the path, press "Ctrl" key, place the mouse cursor over the first node, a little icon will appear, click and the path will be closed.
To edit the nodes, place the mouse cursor above one, a little cross icon will appear, then with a click you select it, clicking over other nodes while pressing "Shift" key will add to the selection, "click/grab" will displace the node/s, click/drag over the the node's handles to control the curve. If you press "Shift" key while grabbing both handles will move in symmetry.
In the "Dialog window" ( the layers one) you should have a "Path" tab, if not, add one, "our" path should be already there, then press the red icon in the window bottom toolbar, the "Path to Selection" one, and now in the image window you have a selection that matches the path line ( -B- in the image above).
Fill the selection with a medium red/brown color. With a soft brush draw a dark brown line to "cut" the lips.
Then, "smudge" the dark brown over the red color. With the "Dodge/Burn" tool, darken the upper lip a bit, smudge, highlight the lower lip a bit, smudge, change brush size, smudge, darken and highlight again ( use the image above, -C-, as a guide if you feel a bit lost).

Now, we'll draw one eyebrow. Add another transparent layer, place it above the "elements" one, and draw an elliptical selection over the eye ( blue crossed line in the image above). "Stroke" the selection with a dark brown as in the previous steps, using a bigger brush.
Delete the stroke, only keeping the upper line, and with the "Smudge" tool, "raise it" a bit in the extremities.
When done, in the "Layer dialogs window", right-click over this layer thumbnail, and choose "Merge Down". After this action, the "new" layer will disappear, and it's content is "dropped" in the previous "elements" one.
To make the left eye we'll use the "Flip" tool ( the arrow icon one). Draw a selection over the eye and eyebrow ( green crossed line), do "Ctrl-C" Key's to copy, "Ctrl-V" keys to paste the selection, the dotted selection line will turn yellow, pick the "Flip tool", place the now arrow cursor over the selection to "mirror" it horizontally, move it to the desired position with the left arrow keyboard key ( use the "guide" layer to position the selection), and when done, pick the "Move tool" and click outside the selection zone to "fix" the selection.
Paint "by hand" the two little nose holes.
Little details and some highlights will add life to the painting...I hope.
Select the "flesh/skin" layer. With the "Airbrush tool" with little "Rate" and "Pressure" and a soft round brush, paint with a brown color between the eyebrows and eyelashes to fake a shadowed zone. Do the same in the little nose triangle, around the holes.
Then, with a big soft brush ( 76x76?) and the "Dodge" tool with little "Rate" highlight the brow, the cheeks and the chin zones. Few strokes with a little movement. With a little brush, do the same to the vertical line of the nose.
Our character face is now, more or less, finished. Probably you're curious/anxious about the way your work will look like once "mapped" in your Blender's 3D model. Let's do a preview. Save your image with a ".XCF" extension ( always save your work in Gimp's native file format). Then, hide the "guide" layer, do "Right-mouse click" in the "Image window" to make the menu appear, choose "Image -> Flatten Image" to "blend" all the layers, and then "Image -> Scale Image" to lower the image size ( this step depends on your needs...and hardware) to 512x512 pixels ( choose "Cubic" "Interpolation type").
The image will loose a little bit of "crispness" that we can compensate with the "Sharpen" filter ( in the "Filters -> Enhance" menu), with a value of "24". Redo "Flatten Image" again.
Now you can save the image in JPG format ( keep the "85" value in the "Quality" slider box).
If your model it's already in Blender's "Face Select" mode, select all the faces in the "3D window" and then, in the "UV Editor window", use the "Image -> Open" menu to browse your hard drive and "load" the "JPG" texture image previously saved.
Your character in the 3D window should look more or less like in the image above at top left ( remember to do Ctrl-Z to activate "Real-time texture shading mode). Not bad for a 30 poly's face I guess?! In the bottom of the image above, at left side, the character it's shown in "shaded mode", and in the right side it have "Real-time lighting" enabled.

If you've the strange feeling, that the character has the stare of a "zombie", it'll be easy to change it.
Select the "eye" layer, draw a "rectangular selection" around the two eyes, pick the "Scale tool", in the "Tool options panel" ( normally under the toolbox window), enable "Cubic" as "Interpolation, enable "Supersampling" and "Constraints -> Keep Width", then in the "Image window" click over the selection zone and move down one of the "Top handles", more or less 1/4 of the lenght. The eyes are now a little more closed, but the "skin" behind looks weird.
To solve the problem, select the "skin" layer, make a copy, freely draw a rose color thin line, following the eyelashes ( to fake eyelids) and a brown line above ( eyelids end). Smudge both ( image above).
Here's the result of the new eyes work. Better?
First of all, be kind with Gimp developers ( and with me too), and never pronounce the word Photoshop™ © ® ( the first and last time I'll use it here).
Yes, The Gimp it's a clone ( at the beginning of his history at least), but, unlike his famous model, The Gimp its high-quality software suitable for poor people ( well, for the others too).
Of course, all's not perfect, and The Gimp have some "weak" points, "memory management" being one.
You'll need lots of "RAM memory", 128 Mb being a drastic minimum, and 256 Mb barely enough to work with big size images. Of course, you can still work in these conditions ( luckily), but "hard disk swap" will became frequent and a bit annoying.
Here's' some ways to optimize your work with The Gimp, tuning the "Preferences dialog" in the "File menu" of the "Main Toolbox":
In the "Environment" section, set "Tile cache size", if you're in the 128 Mb condition, to "100" and close all the other programs while working with the Gimp.
You can change the "Minimal number of Undo levels", to, at least a value of "10"; it's not really important, but quite useful.
The other important tip its about keyboard shortcuts. They're really a precious help, so, memorise or change them to suit your needs, the most used ones, for ex., "Move", "Rectangular Selection", "Paintbrush", "Airbrush", "Smudge" and "Burn/Dodge", "Zoom In", "Zoom Out", etc.
So, time to work. Start the Gimp. Open the "guide" TGA image saved with Blender. This will be the background layer. We'll not use it anymore, you can disable the "Eye icon" or even delete it ( after the next step). Make a copy of the "background" layer, name it "guide" and change it's "Mode" to "Multiply", as in the above image at right ( yes, I have a french language Gimp).
The "Multiply mode will "cut off" the white color of the "guide" image, leaving the black lines untouched. You must keep on mind, that this layer, should always stay on top of the others.
Now, add a new "white" layer, rename it ( "base"?), fill it with a medium grey, and place it between the other two; this layer isn't really necessary, but I like to work this way.
Select the grey layer. Add a new "Transparent" layer, and rename it, "flesh" or "skin" or something like that. In this layer we'll paint the skin color base.
Choose a medium rose color, and paint by hand ( or draw a selection and fill it), the face poly's zone as in the image above. Most of the time it's quite hard to visualize where to paint ( or place) the details, like the eyes or mouth, so it's a good idea to have Blender opened with the character model in "Face Select mode", so you can check the position of the poly's.
Here I've drawn the position of the face's elements ( brown lines in the image above) to help you to visualize.
Add another transparent layer, rename it "Face elements", and place it above the "skin" one.
Choose a white color, choose a "5x5" soft brush, then pick the "Ellipse Selection" tool, draw an horizontal elliptical selection, more or less like in the image above, and fill it.
Choose a dark brown color, do "Right-mouse click" over the window to make the menu appear, choose "Edit", then "Stroke Selection", and in the "Dialog box" choose "Stroke using a Paint tool" and verify that the "Paintbrush" is the one that appears in the "Paint Tool" box, then "OK".
You should have now a dark brown line that surrounds the selection.
Menu -> Selection -> None.
Now, instead of painting, we'll "blend" colors. Pick the "Smudge" tool ( the finger one) and a quite big soft brush ( more or less 1/3 as big as the eye) and give some strokes ( red arrows in the image above) to blend the brown and white colors.
Then, with horizontal strokes over the white color, "clean/rebuild" the eye shape. Play with the "Brush" size and the "Rate" tool option to get a smooth result/feeling.
To "paint" the eyelashes, "smudge" over the top brown line ( blue arrows), but now, don't blend much the colors, avoid to go over the white color. With a little brush draw some brown lines ( yellow lines) and do more smudge work now with a hard brush to define some eyelash lines.
To make the iris and pupil, just paint with a soft brush some strokes in the center of the eye with a blue color, give them a loose round shape, change to a black color, place a stroke in the middle of the blue circle - this will be the pupil, smudge it a bit, and with the "Dodge" tool ( the "black point"? icon) light the top intersection of the black and blue colors, until a white point appear ( image above).
Now, the mouth. We'll use the "Path tool" ( the pen with a line icon). Under the nose triangle face, place six nodes, more or less like in the image above.
It's not needed to be accurate while in "Design" mode, we'll edit them later.
When you've placed the fifth node, to close the path, press "Ctrl" key, place the mouse cursor over the first node, a little icon will appear, click and the path will be closed.
To edit the nodes, place the mouse cursor above one, a little cross icon will appear, then with a click you select it, clicking over other nodes while pressing "Shift" key will add to the selection, "click/grab" will displace the node/s, click/drag over the the node's handles to control the curve. If you press "Shift" key while grabbing both handles will move in symmetry.
In the "Dialog window" ( the layers one) you should have a "Path" tab, if not, add one, "our" path should be already there, then press the red icon in the window bottom toolbar, the "Path to Selection" one, and now in the image window you have a selection that matches the path line ( -B- in the image above).
Fill the selection with a medium red/brown color. With a soft brush draw a dark brown line to "cut" the lips.
Then, "smudge" the dark brown over the red color. With the "Dodge/Burn" tool, darken the upper lip a bit, smudge, highlight the lower lip a bit, smudge, change brush size, smudge, darken and highlight again ( use the image above, -C-, as a guide if you feel a bit lost).
Now, we'll draw one eyebrow. Add another transparent layer, place it above the "elements" one, and draw an elliptical selection over the eye ( blue crossed line in the image above). "Stroke" the selection with a dark brown as in the previous steps, using a bigger brush.
Delete the stroke, only keeping the upper line, and with the "Smudge" tool, "raise it" a bit in the extremities.
When done, in the "Layer dialogs window", right-click over this layer thumbnail, and choose "Merge Down". After this action, the "new" layer will disappear, and it's content is "dropped" in the previous "elements" one.
To make the left eye we'll use the "Flip" tool ( the arrow icon one). Draw a selection over the eye and eyebrow ( green crossed line), do "Ctrl-C" Key's to copy, "Ctrl-V" keys to paste the selection, the dotted selection line will turn yellow, pick the "Flip tool", place the now arrow cursor over the selection to "mirror" it horizontally, move it to the desired position with the left arrow keyboard key ( use the "guide" layer to position the selection), and when done, pick the "Move tool" and click outside the selection zone to "fix" the selection.
Paint "by hand" the two little nose holes.
Little details and some highlights will add life to the painting...I hope.
Select the "flesh/skin" layer. With the "Airbrush tool" with little "Rate" and "Pressure" and a soft round brush, paint with a brown color between the eyebrows and eyelashes to fake a shadowed zone. Do the same in the little nose triangle, around the holes.
Then, with a big soft brush ( 76x76?) and the "Dodge" tool with little "Rate" highlight the brow, the cheeks and the chin zones. Few strokes with a little movement. With a little brush, do the same to the vertical line of the nose.
Our character face is now, more or less, finished. Probably you're curious/anxious about the way your work will look like once "mapped" in your Blender's 3D model. Let's do a preview. Save your image with a ".XCF" extension ( always save your work in Gimp's native file format). Then, hide the "guide" layer, do "Right-mouse click" in the "Image window" to make the menu appear, choose "Image -> Flatten Image" to "blend" all the layers, and then "Image -> Scale Image" to lower the image size ( this step depends on your needs...and hardware) to 512x512 pixels ( choose "Cubic" "Interpolation type").
The image will loose a little bit of "crispness" that we can compensate with the "Sharpen" filter ( in the "Filters -> Enhance" menu), with a value of "24". Redo "Flatten Image" again.
Now you can save the image in JPG format ( keep the "85" value in the "Quality" slider box).
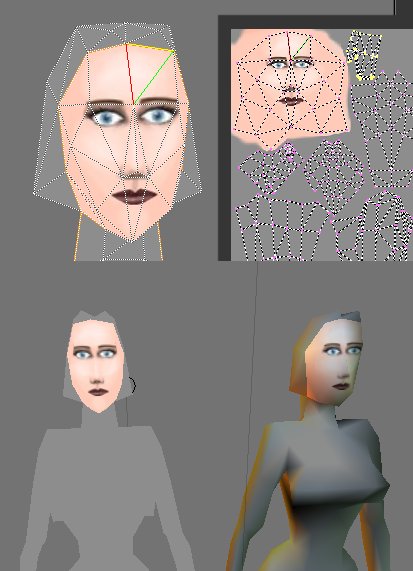
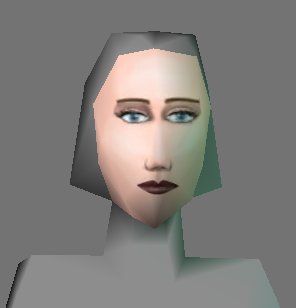
If your model it's already in Blender's "Face Select" mode, select all the faces in the "3D window" and then, in the "UV Editor window", use the "Image -> Open" menu to browse your hard drive and "load" the "JPG" texture image previously saved.
Your character in the 3D window should look more or less like in the image above at top left ( remember to do Ctrl-Z to activate "Real-time texture shading mode). Not bad for a 30 poly's face I guess?! In the bottom of the image above, at left side, the character it's shown in "shaded mode", and in the right side it have "Real-time lighting" enabled.
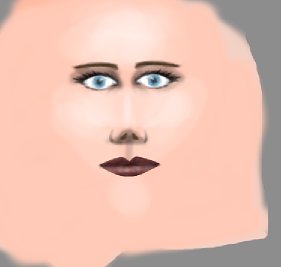
If you've the strange feeling, that the character has the stare of a "zombie", it'll be easy to change it.
Select the "eye" layer, draw a "rectangular selection" around the two eyes, pick the "Scale tool", in the "Tool options panel" ( normally under the toolbox window), enable "Cubic" as "Interpolation, enable "Supersampling" and "Constraints -> Keep Width", then in the "Image window" click over the selection zone and move down one of the "Top handles", more or less 1/4 of the lenght. The eyes are now a little more closed, but the "skin" behind looks weird.
To solve the problem, select the "skin" layer, make a copy, freely draw a rose color thin line, following the eyelashes ( to fake eyelids) and a brown line above ( eyelids end). Smudge both ( image above).
Here's the result of the new eyes work. Better?