GIMP it 1
The goal of this tutorial is to show to people, how to make textures with an image manipulation program, "The Gimp" in this particular case, and use them in Blender's "Game Engine", in a and "easy" and "fast" manner, I hope.
Even if you don't have graphics skills, give it a try. If you've worked with the "Game Engine" of Blender for a while, you probably noticed, that "true" low poly count character/object models ( around 300 vertices) are almost mandatory for your games/demos, due to the "slowness" of the "engine".
Of course, you would like that those characters/objects still look nice?
Textures and a good use of them, can enhance or even "save" a poor model. Only a basic knowledge of Blender and the Gimp ( or other image manipulation software) is required to do this tutorial, and some... Zen attitude.
The main method to apply textures in 3D objects ( specially in games), its the so called "Image map" technique. The image above explain basically the concept; a flat image is perpendicularly "projected" over each face ( or selections of faces) of the 3D object.
This works quite well in square shaped models, but distortions will appear in more rounded ones, as you can see in the image above at left. You can visualize the problem on your own, trying to perfectly flatten a paper image over a doll's body.
Luckily, Blender have some tools to help us to deal with those difficulties.

It's almost always a good idea to start with an existing model. If you don't have one or want to closely follow this tutorial, please, download this file, inside there's a clone object of a well known game character, taken from an old tutorial of mine.
Now open the downloaded file in Blender. As you can see, the model is already textured ( -A- in the image above). But not with "image textures", only with "Vertex Colors", a special technique, very "light", suitable for old computers or graphic cards.
As told in the "Vertex Colors tutorial", the "negative" point of this method, is the need of additional vertices over the "Image Map" method one.
Please, check the vertex count in the image above for the model in -A.
889 vertices! Too much for our around 300 vertices goal. Let's try to reduce this count.
Select the model, make a copy, and move it a bit to the side. Now, in another window, choose the "Scripts" window type, click over the "Scripts button", then go to the "Mesh" item and choose "Poly Reducer" in the sub-level menu.
Don't touch the default settings in the script's pop-up window, and press the "OK" button. Great script! As you can see in the image above ( and, surely, in your own Blender session), -B- model, the vertex count its now 424. Not bad. And the overall shape and Vertex Colors are almost preserved.
But we can do better. Make a new copy of the original model, place it at far right, choose the "Poly Reducer" script again, but now disable the "Triangulate" button. Check the result: 332 vertices. Great!
Sure, the "Vertex Colors texture" is now quite damaged, and the object/mesh itself have suffered a bit. But it's not important, we'll solve these problems quite easily.

You can now delete or place the two first models on another layer. Select the last one, and enter "Edit" mode. Check for "ugly" poly's ( distorted), holes, vertices's that can be deleted, etc. Look at the image above. I show some of the common problems:
The nose and mouth are not in the face axis of symmetry.
The overall face shape needs some tweaking.
The boots have now a pointed shape ( well, maybe you like them this way).
At least one leg vertices row can be "merged/deleted".
The fingers are flat and need some thickness added.
Certainly some other errors can be found and optimization can be done. It's up to you to do or not the job.
These are "general" tips. For example, the hand it's quite basic ( and ugly). If you need a more complete one, add some faces.

Now, we/you need to define a game/texture style method. It's an important step, it'll be quite difficult to return back or change style without braking the coherence of the game/demo.
To give you some hints, I've made a three styles example as shown in the image above. The -A- character uses a "flat" texture and have "real-time lighting" enabled in Blender.
The -B- character uses the same "flat" texture without "real-time lighting".
The -C- character uses a more complex texture, with light shading and faked shadows without "real-time lighting".
In this tutorial I'll use a style more or less like in -C-, with shadows only suggested, quite easy to do and good to use with "real-time lighting".
Before we start to paint our texture, we need a "guide", a special image that will show us where to paint and where not, similar to the well known "paint by numbers" ones.
How to obtain this special image? Look at the image above, please. As you can see, to obtain the " guide image", at far right, in the "UV Editor window" ( if you don't have one, just add a new window and choose the "UV/Image Editor" as window type), of the red cube, we must do some "cuts/seams" to allow Blender to unfold and flat the object, making the paint work more "easy".
Of course, these "cuts" are virtual ones, your object remains untouched. Much of the quality of a texture depends on this step. Even if the paint work its a basic one, it can be much emphasized with a well unwrapped/unfolded object.

Here's the basic "unwrap" technique.
Enter "Edit mode", "Edges Select Mode", and with "Right-mouse button" clicks, while pressing "Shift" key, select a row of edges to make a closed border between the face area and the hair one ( image above). Select one edge under the chin too.
Then, do "Ctrl-E" keys, and choose the "Mark Seam" item; the yellow edge selection will change to orange color. This will be our first "cut/seam". Save your work frequently, sometimes with different names, maybe, to keep different states of your work ( always useful).
Now, go out of "Edit mode". Press F key to enter "Face Select mode". Your object turns into white color. Notice the orange seams in the face area.
"Right-button mouse" click inside the seam zone to select one face and press the L key to select all the faces inside the seam . Then press "U key" to make appear the " UV Calculation" menu and choose "Unwrap" ( -A- in the image above). B- shows how the "Unwrapped" faces will appear in he "UV Editor" window ( maybe not exactly the same way, maybe you must rotate the faces a little).
Some words about the "Unwrap" action; this is a special and powerful function that "unfolds" the selected faces automatically, trying to fill the "UV Editor" texture space, the best possible way.
Of course, sometimes the results are not good/workable, but when used with "good" seams, its a very useful tool.
Now, in the "UV Editor", select all the faces, scale them down a little, an place them outside the "active" area ( -C- in the image above).

You can now hide the already "unwrapped" faces with H key ( Alt-H to unhidden). The hair zone it'll be a little more complicated to "unwrap". Use the image above as a guide, please. Actually we just need to isolate the hair from the neck, and select a vertical row in the ponytail poly's. Mark seams.
If you've made an error marking unwanted seams, just select the desired ones, do Ctrl-E keys and choose "Unmark Seams" in the pop-up menu.
When done, go out "Edit mode", enter "Face Select mode", U key and choose "Unwrap". The UV faces will appear more or less like in the image above at right. You can use the checkered built-in image test, to look for distortions; to do this click over the "Image" menu in the toolbar, choose "New", enable the "UV Text Grid" button, and press "OK".

The image above shows one of the most common problems that happens when using the "Unwrap" function; the "ratio" between the faces size it's not respected. Here, the faces in the top of the head appear smaller in the "UV Editor" in comparison with the middle/bottom ones. Also, the "symmetry axis" is distorted in the "UV Editor". To correct this, select one or two top right vertices and with the "Proportional Edit tool" move the vertices to the right and top, controlling with "Page Up" and "Page Down" keys the amount of vertices affected by the movement. Once the "axis" line its in place and the overall faces proportions more or less correct, do "Left-mouse click" to fix the action.

Now, go ahead, make seams for all the different elements of the body ( use the image above as a guide), in this case , "face" and "hair", already done, "front torso" and "back torso" that includes the "neck", "left arm", "right arm", "left hand", "right hand", "front and back pelvic area", "left leg", "right leg ", "left foot", "right foot" and both "feet soles".
Keep in min that the seams must close ( isolate) the different groups, and that the vertical seams line must be without gaps.
Hands could be quite difficult to "unwrap", so, I've included a detail of the hand seam.

The image above, -A-, shows the model in "Face Selection mode", with all the faces selected.
If you want to skip this step ( quite tedious, I must admit), just press U key in the "3D window" and choose "Unwrap" in the pop-up menu. This powerful function will unfold all the faces groups defined by the seams and place them inside the "UV Editor texture area".
The proportions between the faces will be respected, too, but to me, this is an inconvenient way of doing "unwrap".
I like to control the size of the different groups, and how they're disposed. Well, to be fair, even with the "automatic unwrap", you can ( you must?) still scale and displace groups of faces.
So, to "unwrap" my way, you select a group of faces, choose the desired "UV Calculation" item, in the "UV Editor" window, select the freshly appeared group of faces and place it outside the "active" square area ( remember more or less where you place your groups to avoid overlaps; check -B- section in the image above, please).
I've used the "Unwrap's" "UV Calculation menu" in all groups, except, the "pelvic area", front and back, where I've used the "Project from View" in "Front View".In the image above, -C-, shows the final disposition of the groups.
Why I want to control the "unwrap"? One good example is the character's face ( even, if in most situations the character appears backside), to give it detail/personality we need "space", that's why I make the "face's group" bigger than the others.
Another one, is the fact that the "unwrap function will separate all the seams/groups, so, at the end we'll have two "Arms" groups, two "Legs" groups and so on, and this is unnecessary work, because we can paint both symmetric groups at one time, mirroring one of the groups and make it overlap the other ( image above).
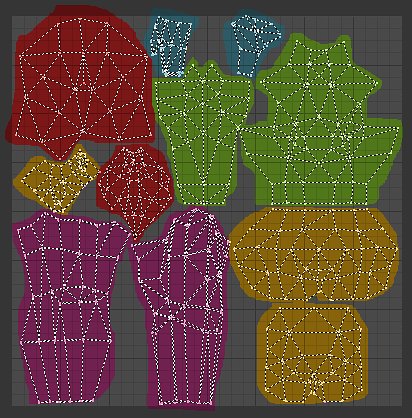
The image above displays the different "unwrap" groups ( from left to right, top to bottom):
Red - Face and hair
Yellow - Boots, front and back pelvic area
Pink - Legs and arms
Blue - Outside and inside hands
Green - Back and front torso
If you want to skip all these "unwrap" steps, or compare your work with mine, download this unwrapped model. When the "unwrap" work is done, in the UV Editor window menu's bar, press the UVs item and choose "Scripts/Save UV Face Layout". In the "UV Image Export" window, set "Size:" to "1024" at least ( or even 2048 if your hardware is powerful), and press the "OK" button; Blender will open a file browser, choose the desired location and press "Enter" key.
An image file with TGA extension and with the "Object" name will be created and saved in your hard drive ( or somewhere else).
Even if you don't have graphics skills, give it a try. If you've worked with the "Game Engine" of Blender for a while, you probably noticed, that "true" low poly count character/object models ( around 300 vertices) are almost mandatory for your games/demos, due to the "slowness" of the "engine".
Of course, you would like that those characters/objects still look nice?
Textures and a good use of them, can enhance or even "save" a poor model. Only a basic knowledge of Blender and the Gimp ( or other image manipulation software) is required to do this tutorial, and some... Zen attitude.
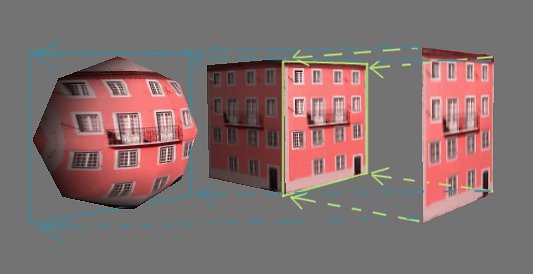
The main method to apply textures in 3D objects ( specially in games), its the so called "Image map" technique. The image above explain basically the concept; a flat image is perpendicularly "projected" over each face ( or selections of faces) of the 3D object.
This works quite well in square shaped models, but distortions will appear in more rounded ones, as you can see in the image above at left. You can visualize the problem on your own, trying to perfectly flatten a paper image over a doll's body.
Luckily, Blender have some tools to help us to deal with those difficulties.
It's almost always a good idea to start with an existing model. If you don't have one or want to closely follow this tutorial, please, download this file, inside there's a clone object of a well known game character, taken from an old tutorial of mine.
Now open the downloaded file in Blender. As you can see, the model is already textured ( -A- in the image above). But not with "image textures", only with "Vertex Colors", a special technique, very "light", suitable for old computers or graphic cards.
As told in the "Vertex Colors tutorial", the "negative" point of this method, is the need of additional vertices over the "Image Map" method one.
Please, check the vertex count in the image above for the model in -A.
889 vertices! Too much for our around 300 vertices goal. Let's try to reduce this count.
Select the model, make a copy, and move it a bit to the side. Now, in another window, choose the "Scripts" window type, click over the "Scripts button", then go to the "Mesh" item and choose "Poly Reducer" in the sub-level menu.
Don't touch the default settings in the script's pop-up window, and press the "OK" button. Great script! As you can see in the image above ( and, surely, in your own Blender session), -B- model, the vertex count its now 424. Not bad. And the overall shape and Vertex Colors are almost preserved.
But we can do better. Make a new copy of the original model, place it at far right, choose the "Poly Reducer" script again, but now disable the "Triangulate" button. Check the result: 332 vertices. Great!
Sure, the "Vertex Colors texture" is now quite damaged, and the object/mesh itself have suffered a bit. But it's not important, we'll solve these problems quite easily.
You can now delete or place the two first models on another layer. Select the last one, and enter "Edit" mode. Check for "ugly" poly's ( distorted), holes, vertices's that can be deleted, etc. Look at the image above. I show some of the common problems:
The nose and mouth are not in the face axis of symmetry.
The overall face shape needs some tweaking.
The boots have now a pointed shape ( well, maybe you like them this way).
At least one leg vertices row can be "merged/deleted".
The fingers are flat and need some thickness added.
Certainly some other errors can be found and optimization can be done. It's up to you to do or not the job.
These are "general" tips. For example, the hand it's quite basic ( and ugly). If you need a more complete one, add some faces.
Now, we/you need to define a game/texture style method. It's an important step, it'll be quite difficult to return back or change style without braking the coherence of the game/demo.
To give you some hints, I've made a three styles example as shown in the image above. The -A- character uses a "flat" texture and have "real-time lighting" enabled in Blender.
The -B- character uses the same "flat" texture without "real-time lighting".
The -C- character uses a more complex texture, with light shading and faked shadows without "real-time lighting".
In this tutorial I'll use a style more or less like in -C-, with shadows only suggested, quite easy to do and good to use with "real-time lighting".
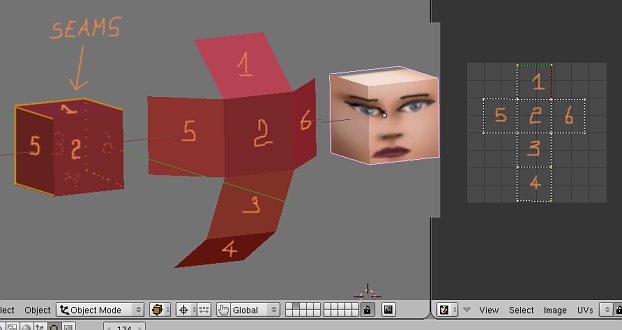
Before we start to paint our texture, we need a "guide", a special image that will show us where to paint and where not, similar to the well known "paint by numbers" ones.
How to obtain this special image? Look at the image above, please. As you can see, to obtain the " guide image", at far right, in the "UV Editor window" ( if you don't have one, just add a new window and choose the "UV/Image Editor" as window type), of the red cube, we must do some "cuts/seams" to allow Blender to unfold and flat the object, making the paint work more "easy".
Of course, these "cuts" are virtual ones, your object remains untouched. Much of the quality of a texture depends on this step. Even if the paint work its a basic one, it can be much emphasized with a well unwrapped/unfolded object.
Here's the basic "unwrap" technique.
Enter "Edit mode", "Edges Select Mode", and with "Right-mouse button" clicks, while pressing "Shift" key, select a row of edges to make a closed border between the face area and the hair one ( image above). Select one edge under the chin too.
Then, do "Ctrl-E" keys, and choose the "Mark Seam" item; the yellow edge selection will change to orange color. This will be our first "cut/seam". Save your work frequently, sometimes with different names, maybe, to keep different states of your work ( always useful).
Now, go out of "Edit mode". Press F key to enter "Face Select mode". Your object turns into white color. Notice the orange seams in the face area.
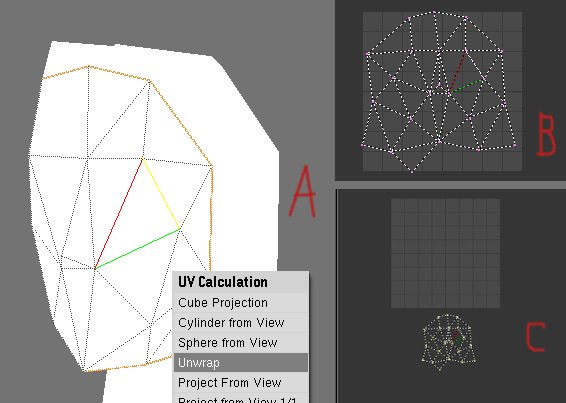
"Right-button mouse" click inside the seam zone to select one face and press the L key to select all the faces inside the seam . Then press "U key" to make appear the " UV Calculation" menu and choose "Unwrap" ( -A- in the image above). B- shows how the "Unwrapped" faces will appear in he "UV Editor" window ( maybe not exactly the same way, maybe you must rotate the faces a little).
Some words about the "Unwrap" action; this is a special and powerful function that "unfolds" the selected faces automatically, trying to fill the "UV Editor" texture space, the best possible way.
Of course, sometimes the results are not good/workable, but when used with "good" seams, its a very useful tool.
Now, in the "UV Editor", select all the faces, scale them down a little, an place them outside the "active" area ( -C- in the image above).
You can now hide the already "unwrapped" faces with H key ( Alt-H to unhidden). The hair zone it'll be a little more complicated to "unwrap". Use the image above as a guide, please. Actually we just need to isolate the hair from the neck, and select a vertical row in the ponytail poly's. Mark seams.
If you've made an error marking unwanted seams, just select the desired ones, do Ctrl-E keys and choose "Unmark Seams" in the pop-up menu.
When done, go out "Edit mode", enter "Face Select mode", U key and choose "Unwrap". The UV faces will appear more or less like in the image above at right. You can use the checkered built-in image test, to look for distortions; to do this click over the "Image" menu in the toolbar, choose "New", enable the "UV Text Grid" button, and press "OK".
The image above shows one of the most common problems that happens when using the "Unwrap" function; the "ratio" between the faces size it's not respected. Here, the faces in the top of the head appear smaller in the "UV Editor" in comparison with the middle/bottom ones. Also, the "symmetry axis" is distorted in the "UV Editor". To correct this, select one or two top right vertices and with the "Proportional Edit tool" move the vertices to the right and top, controlling with "Page Up" and "Page Down" keys the amount of vertices affected by the movement. Once the "axis" line its in place and the overall faces proportions more or less correct, do "Left-mouse click" to fix the action.
Now, go ahead, make seams for all the different elements of the body ( use the image above as a guide), in this case , "face" and "hair", already done, "front torso" and "back torso" that includes the "neck", "left arm", "right arm", "left hand", "right hand", "front and back pelvic area", "left leg", "right leg ", "left foot", "right foot" and both "feet soles".
Keep in min that the seams must close ( isolate) the different groups, and that the vertical seams line must be without gaps.
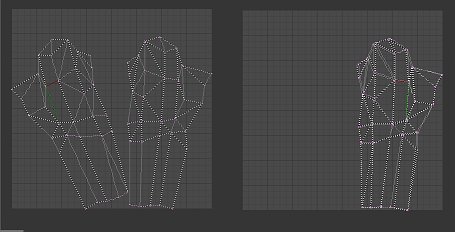
Hands could be quite difficult to "unwrap", so, I've included a detail of the hand seam.
The image above, -A-, shows the model in "Face Selection mode", with all the faces selected.
If you want to skip this step ( quite tedious, I must admit), just press U key in the "3D window" and choose "Unwrap" in the pop-up menu. This powerful function will unfold all the faces groups defined by the seams and place them inside the "UV Editor texture area".
The proportions between the faces will be respected, too, but to me, this is an inconvenient way of doing "unwrap".
I like to control the size of the different groups, and how they're disposed. Well, to be fair, even with the "automatic unwrap", you can ( you must?) still scale and displace groups of faces.
So, to "unwrap" my way, you select a group of faces, choose the desired "UV Calculation" item, in the "UV Editor" window, select the freshly appeared group of faces and place it outside the "active" square area ( remember more or less where you place your groups to avoid overlaps; check -B- section in the image above, please).
I've used the "Unwrap's" "UV Calculation menu" in all groups, except, the "pelvic area", front and back, where I've used the "Project from View" in "Front View".In the image above, -C-, shows the final disposition of the groups.
Why I want to control the "unwrap"? One good example is the character's face ( even, if in most situations the character appears backside), to give it detail/personality we need "space", that's why I make the "face's group" bigger than the others.
Another one, is the fact that the "unwrap function will separate all the seams/groups, so, at the end we'll have two "Arms" groups, two "Legs" groups and so on, and this is unnecessary work, because we can paint both symmetric groups at one time, mirroring one of the groups and make it overlap the other ( image above).
The image above displays the different "unwrap" groups ( from left to right, top to bottom):
Red - Face and hair
Yellow - Boots, front and back pelvic area
Pink - Legs and arms
Blue - Outside and inside hands
Green - Back and front torso
If you want to skip all these "unwrap" steps, or compare your work with mine, download this unwrapped model. When the "unwrap" work is done, in the UV Editor window menu's bar, press the UVs item and choose "Scripts/Save UV Face Layout". In the "UV Image Export" window, set "Size:" to "1024" at least ( or even 2048 if your hardware is powerful), and press the "OK" button; Blender will open a file browser, choose the desired location and press "Enter" key.
An image file with TGA extension and with the "Object" name will be created and saved in your hard drive ( or somewhere else).