Colour Power 1
This is a little tutorial perfect for people who don't have the skill of making good looking textures or/and are too lazy to assign them with the Blender's UV Texture editor.
As most game engine techniques there are some "Pros" and "Cons". In the good side: no need of textures and the related UV Texture editor work, much small file size well suited for the Web-plugin ( unfortunately not suported anymore by the Blender Foundation) and increase of speed in Game mode. In the bad side: the need to model all the "lines", thus obtaining objects with significantly more polys.
To illustrate this tutorial we'll take inspiration from the allready classic Lara Croft character, and try to get the result shown in the image below.

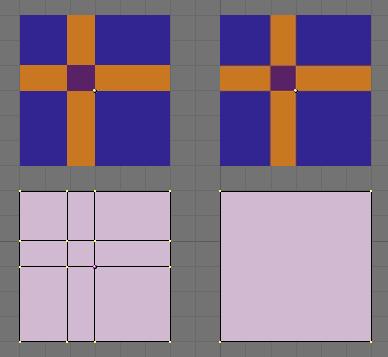
As I've said before, one of the Vertex Colours technique handicap ( the bigger) is, that we must "model all the lines", adding more "unnecessary" polys to your objects. Please, look at the image below to understand this:
to obtain the same result of the object at right ( a plane with a JPG texture UV assigned), with only the Vertex Colours method, we must create a plane and subdivide it in order to obtain the cross shape, and then, assign colours to the faces. At the end, we have 16 vertices on the Vertex Colors plane "against" only four in the UV texture one. Ouch!
Yes, this penalizes the game engine, but not that much, and in a complete level it'll be not important, in my opinion.
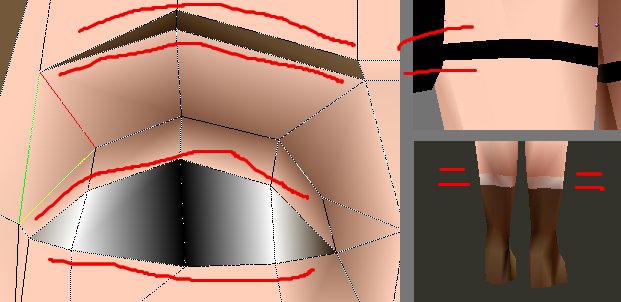
One of the constrains of this method is that you must know quite precisely what your character will look like in the final state ( well, probably it should always be that way), to make a choice of what "character lines" you must/should model.
A good choice it's important in order to obtain a good character definition and a vertices count light one too. Most of the times the good ones are obvious ( some examples in the image above).

Let's go. If you want to follow closely this tutorial, download the character model blender file here.
Unzip the file and open it in Blender ( or load a character of yours). There's two characters inside, a basic one ( image above), and one at the final state of the tutorial; this way you can compare your work.
Disable the second layer ( finnished model) and in the first layer enter Edit mode ( the character should be already selected).

In Editing buttons window (F9), Link and Material panels, press the New button to add the first material to the character ( all the faces get the new material). Go to the Shading window (F5), choose a skin like RGB colour and rename the material "skin" ( image above).

Then, with the new tools of the 2.36 version ( use mainly the face tool, image above at right) select a t-shirt like area ( in the back too, of course).
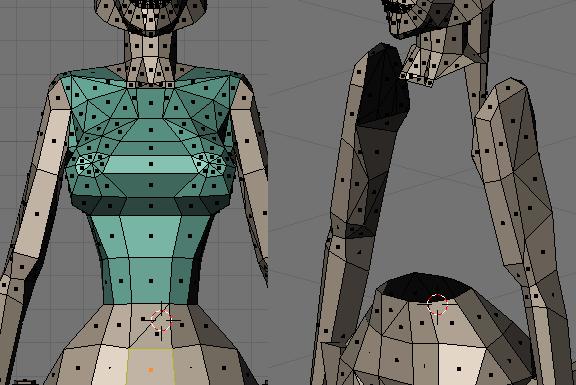
In Editing window add a new material index again (2 Mat 2), go to the Shading window, make it "single-user" ( click the little square near the material's name) and rename it "t-shirt". After this choose a green RGB colour, and return to the Edit buttons. Here press the Assign button to "give" the green colour to the model ( image above at left).
Now, with the faces still selected, press Y key to split them, and H key to hide them ( image above at right).


Now, go ahead. Select carefully and patiently the different groups of faces ( each group should receive a different material or one used before in the model) and repeat the steps described above.
At the end, you should have more or less a character like the one in the image above at left.
"Uf, it's over!" I hear you say?! Ok, so, press P to enter Game mode...huh, weird? Well, try to render...not terrible either ( image above at right)?
Please, go to the next chapter, to learn how to use your freshly textured model in the game engine displaying "artistic colours". How excitant, isnt'it?
As most game engine techniques there are some "Pros" and "Cons". In the good side: no need of textures and the related UV Texture editor work, much small file size well suited for the Web-plugin ( unfortunately not suported anymore by the Blender Foundation) and increase of speed in Game mode. In the bad side: the need to model all the "lines", thus obtaining objects with significantly more polys.
To illustrate this tutorial we'll take inspiration from the allready classic Lara Croft character, and try to get the result shown in the image below.
As I've said before, one of the Vertex Colours technique handicap ( the bigger) is, that we must "model all the lines", adding more "unnecessary" polys to your objects. Please, look at the image below to understand this:
to obtain the same result of the object at right ( a plane with a JPG texture UV assigned), with only the Vertex Colours method, we must create a plane and subdivide it in order to obtain the cross shape, and then, assign colours to the faces. At the end, we have 16 vertices on the Vertex Colors plane "against" only four in the UV texture one. Ouch!
Yes, this penalizes the game engine, but not that much, and in a complete level it'll be not important, in my opinion.
One of the constrains of this method is that you must know quite precisely what your character will look like in the final state ( well, probably it should always be that way), to make a choice of what "character lines" you must/should model.
A good choice it's important in order to obtain a good character definition and a vertices count light one too. Most of the times the good ones are obvious ( some examples in the image above).
Let's go. If you want to follow closely this tutorial, download the character model blender file here.
Unzip the file and open it in Blender ( or load a character of yours). There's two characters inside, a basic one ( image above), and one at the final state of the tutorial; this way you can compare your work.
Disable the second layer ( finnished model) and in the first layer enter Edit mode ( the character should be already selected).
In Editing buttons window (F9), Link and Material panels, press the New button to add the first material to the character ( all the faces get the new material). Go to the Shading window (F5), choose a skin like RGB colour and rename the material "skin" ( image above).
Then, with the new tools of the 2.36 version ( use mainly the face tool, image above at right) select a t-shirt like area ( in the back too, of course).
In Editing window add a new material index again (2 Mat 2), go to the Shading window, make it "single-user" ( click the little square near the material's name) and rename it "t-shirt". After this choose a green RGB colour, and return to the Edit buttons. Here press the Assign button to "give" the green colour to the model ( image above at left).
Now, with the faces still selected, press Y key to split them, and H key to hide them ( image above at right).
Now, go ahead. Select carefully and patiently the different groups of faces ( each group should receive a different material or one used before in the model) and repeat the steps described above.
At the end, you should have more or less a character like the one in the image above at left.
"Uf, it's over!" I hear you say?! Ok, so, press P to enter Game mode...huh, weird? Well, try to render...not terrible either ( image above at right)?
Please, go to the next chapter, to learn how to use your freshly textured model in the game engine displaying "artistic colours". How excitant, isnt'it?